You’re probably thinking fermentation sounds intimidating, right? It’s actually way simpler than you’d expect. With just a few basic supplies and your kitchen counter, you’ll be transforming cabbage into tangy sauerkraut faster than you can say “probiotics.” But here’s the thing—there’s a right way and a wrong way to set up your station, and one small mistake early on can derail your entire batch.
Key Takeaways
- Choose a cool, consistent location away from direct sunlight with stable temperature between 65–75°F for most ferments.
- Start with forgiving beginner projects like sauerkraut, kimchi, or pickles that require minimal equipment and experience.
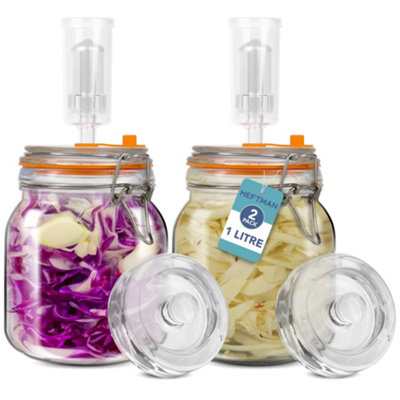
- Use glass vessels, sterilize all equipment thoroughly, and fill airlocks with water to prevent contamination and ensure functionality.
- Monitor daily using sensory cues: observe bubbles, smell for pleasant tanginess, taste periodically, and keep detailed notes.
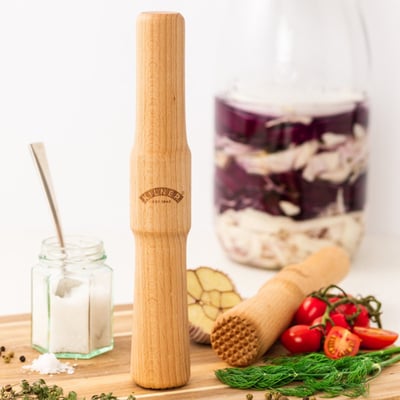
- Pack jars firmly with two inches headspace, maintain stable temperature, and adjust location if fermentation activity appears sluggish.

Understanding Fermentation Basics

Before you dive headfirst into the wonderful world of fermentation, you’ve gotta understand what’s actually happening in that jar you’re about to create. It’s not magic—it’s microbial ecology in action. Basically, you’re inviting billions of tiny organisms to throw a party in your food. These little guys, mostly bacteria and fungi, are munching away on sugars and starches, producing acids and gases that transform your ingredients. Pretty wild, right?
This sensory education starts simple. You’ll notice bubbles forming, smells changing, and tastes shifting. Your fermentation station becomes a living laboratory where flavor develops day by day. The process preserves food while creating complex, tangy, and genuinely delicious results. Think of it as controlled chaos that tastes amazing.
When setting up your fermentation station, it’s helpful to consider material quality and durability to ensure your setup is safe, easy to clean, and built to last.
Choosing the Right Fermentation Station for Your Needs
Now that you’ve got the basics down, it’s time to set up your fermentation station—and yes, you actually need one. Think about your space. You don’t need a dedicated room; space saving layouts work great in kitchens, closets, or even under counters. Consider temperature stability because fermentation’s picky about conditions. Invest in portable controllers to monitor your brews wherever they’re chillin’. These gadgets let you keep tabs on everything without hovering like an anxious parent. Decide if you’re fermenting one jar or launching a full fermentation empire. Shelving units are your friends here. Make sure there’s good airflow and minimal light exposure. Your future kombucha, kimchi, or sauerkraut self will thank you for thinking this through now. For extra efficiency, look for energy consumption and efficiency features in your fermentation equipment to save on electricity while maintaining stable temperatures.
Essential Equipment and Supplies to Gather

Now that you’ve got your fermentation station picked out, it’s time to stock up on the good stuff—and don’t worry, you won’t need to mortgage your house. You’re gonna want to grab three main categories of supplies: vessels and containers to hold your fermenting goodies, cultures and starter to kickstart the whole magical process, and monitoring and testing tools so you can actually know what’s happening in there instead of just hoping for the best. For even more reliable results, consider using temperature precision tools similar to those in sous vide cooking, as maintaining the correct temperature is crucial for successful fermentation.

Vessels and Containers
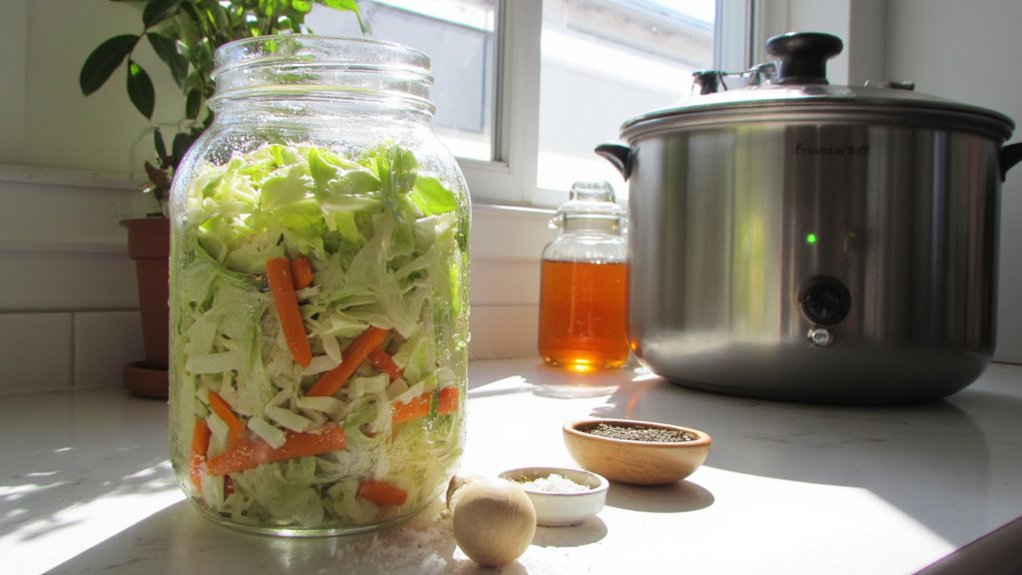
The right container’s your foundation—think of it as the home where your fermentation magic’ll actually happen. You’ll want glass crocks, which are absolutely stellar for keeping out light and maintaining consistent temperatures. They’re durable, easy to clean, and won’t leach anything funky into your brew. Glass jars work great too if you’re watching your budget.
Don’t overlook bamboo baskets for draining or organizing your supplies. They’re cute, functional, and honestly, they make your fermentation station look way more intentional than it probably is.
Avoid plastic containers whenever possible—they’re porous and’ll absorb flavors and odors like nobody’s business. Metal’s generally a no-go unless it’s stainless steel, since acidic ferments can corrode regular metals. Stick with glass. Your future self’ll thank you.
For those considering alternative materials, know that cast iron’s heat retention and durability make it a kitchen favorite, but it’s not suitable for most ferments due to potential reactivity—saving it for cooking is a better bet.
Cultures and Starter
Gathering your cultures and starters is where things get real—this is basically your fermentation team, the microscopic MVPs that’ll transform ordinary ingredients into something genuinely delicious. You’ve got options here. Wild yeast floating around in your kitchen might sound sketchy, but it’s legit. Commercial starter cultures like yogurt or kefir grains give you more control and predictability. Then there’s kombucha SCOBYs, sourdough starters, and specialized blends for different ferments.
The key thing? Culture maintenance. You’ll need to keep these living organisms happy and fed, which means regular feeding schedules and proper storage. Think of it like having tiny pets that reward your attention with incredible flavor. Don’t stress though—most starters are pretty forgiving if you treat ’em right. If you’re looking for inspiration on maintaining your setup, consider how dishwasher-safe models in other kitchen projects can simplify clean-up and make your fermentation process much more manageable.
Monitoring and Testing Tools
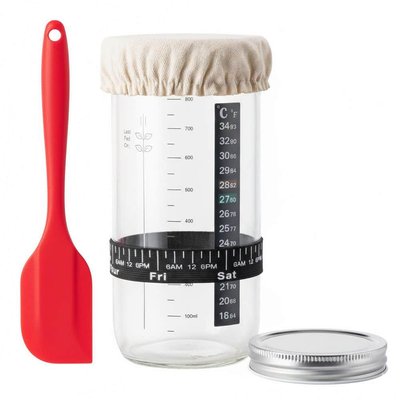
Once you’ve got your cultures thriving, you’re gonna want some tools to actually know what’s happening in that jar of yours. pH meters are your best friend here, letting you track acidity levels so nothing goes sideways. They’re surprisingly affordable and dead easy to use. Gas analyzers help you understand what those little microbes are producing, which is pretty cool if you’re into the science-y stuff. You’ll also want basic thermometers because temperature matters more than you’d think. Grab some testing strips too—they’re cheap insurance against fermentation disasters. These tools transform you from a hopeful guessser into an actual fermentation scientist. You don’t need fancy equipment, just reliable ones that give you honest readings and keep your batches on track.
Setting Up Your Fermentation Station

Your kitchen’s about to become ground zero for tiny, magical microbes, and honestly? It’s thrilling. You’ll want to pick a spot that’s cool and consistant, away from direct sunlight. Ambient lighting matters less than you’d think, but you don’t want your jars sitting in a sunny window where heat’ll mess with your fermentation. Consider your storage layout carefully. Dedicate a small shelf or corner where your vessels can hang out undisturbed. Keep everything within arm’s reach, though, because you’ll be checking on your brew regularly. Make sure there’s good air circulation, and honestly, a little counter space is clutch for prep work. Your fermentation station doesn’t need to be fancy. Just thoughtful. Just yours.
Selecting Your First Fermentation Project
Now that you’ve got your fermentation station locked down, it’s time to pick what you’re actually gonna ferment. Here’s the thing: beginners often fall victim to fermentation myths, thinking everything’s complicated. It’s not. Start simple and build confidence.
Consider these beginner-friendly options:
- Sauerkraut (literally just cabbage and salt)
- Kimchi (cabbage with awesome flavor pairings like garlic and ginger)
- Pickles (tangy, crunchy, hard to mess up)
- Kombucha (requires a SCOBY, but super rewarding)
- Hot sauce (perfect for experimenting with flavor pairings)
Pick something you’ll actually eat. That’s key. Your enthusiasm matters more than fancy equipment or complicated recipes. Start with sauerkraut if you’re feeling nervous—it’s basically impossible to wreck. You’ve got this.
Step-by-Step Guide to Your First Batch

Let’s get down to the nitty-gritty of actually making your first batch. First, you’ll want to nail your sanitation practices because nobody wants a jar of moldy regret. Sterilize everything. Seriously.
Next, prep your ingredients and combine them according to your recipe. Mix, stir, and trust the process. Now here’s where batch timing comes in—fermentation isn’t a sprint. Depending on what you’re fermenting, you’re looking at anywhere from three days to three weeks. Keep it somewhere cool and dark. Temperature matters more than you’d think.
Check your creation regularly. Taste it. Smell it. Does it seem happy? You’ll develop an instinct for when it’s ready. When that moment hits and you crack open your first jar of homemade fermented goodness? Pure magic. You’ve officially joined the fermentation club.
Monitoring Temperature and Fermentation Progress
Now here’s where things get real—you’ve gotta nail those temperature ranges, because your little microbes are way pickier than your houseplants. You’ll want to keep tabs on how your ferment’s progressing through each stage, watching for the telltale signs that tell you whether you’re crushing it or heading toward a jar full of regret, plus you’ll need to know what to do when things go sideways. Stick with us as we break down the ideal temps, how to spot what stage you’re in, and the quick fixes that’ll save your batch from becoming an expensive science experiment gone wrong.
Ideal Temperature Ranges
Because temperature controls everything in fermentation, you’ve got to keep a close eye on it if you want your batch to turn out right. Here’s the thing: different ferments have different sweet spots, and nailing those ranges makes all the difference between success and, well, a jar of regret.
Your ideal temps depend on what you’re fermenting:
- Vegetables: 65–75°F works great
- Kombucha: Aim for 75–85°F, friend
- Wine: Keep it around 55–70°F
- Kefir: Prefers 68–78°F
- Miso: Needs warmth at 80–90°F
Maintain ambient stability throughout fermentation. Avoid thermal gradients that’ll stress your cultures. Watch that temperature closely—fluctuations wreck the whole process faster than you’d think!
Tracking Fermentation Stages
Once you’ve got your ferment sitting at the right temperature, the real adventure begins—you’ve gotta know what’s happening inside that jar. This is where sensory checkpoints become your best friend. Start by peeking at your ferment daily, watching for those vital fermentation milestones. You’ll notice bubbles rising, which is basically your microbes throwing a party. Give it a gentle sniff too—it should smell pleasantly tangy, not like a gym locker. The liquid might get a bit cloudy or develop a white film on top. That’s usually fine, though occasionally it’s not. Keep notes on what you see, smell, and taste. By tracking these changes, you’ll develop an intuitive feel for your ferment’s personality and know exactly when it’s reached peak deliciousness.
Troubleshooting Common Issues
Even when you’re doing everything right, your ferment might throw you a curveball—and that’s totally normal. Don’t panic. Here’s what to watch for:
- Off smells: Trust your nose. Funky odors signal trouble, but tangy vinegar scents are usually fine.
- Mold growth: White fuzzy stuff on top? Toss it. Follow strict sanitation protocols to prevent this.
- Slow fermentation: Cold temperatures are the culprit. Move your station somewhere warmer.
- Excessive bubbling: Your ferment’s just enthusiastic. It’ll settle down.
- Strange texture: Use sensory evaluation to check taste and appearance before deciding its fate.
Monitor temperature consistently. Your fermentation station should stay between 65-75°F for prime results. When you’re unsure, rely on sensory evaluation and your instincts—they’re surprisingly reliable guides through this delicious adventure.
Troubleshooting Common Beginner Mistakes
If your fermentation’s gone a bit wonky, don’t worry—you’re definitely not alone. Most beginners face a few hiccups along the way, and that’s totally normal. One common culprit? Airlock troubleshooting. If your airlock isn’t bubbling, check that it’s filled with water and seated properly in the lid. Sometimes you’ll get jar overflows when you’re too enthusiastic with your vegetables or brine. Here’s the thing: pack your jars firmly but leave about two inches of headspace at the top. Temperature matters too. Keep your fermentation station around 65 to 75 degrees Fahrenheit, and you’ll see much better results. Don’t stress if your first batch isn’t perfect—you’re learning, and that’s what counts.
Frequently Asked Questions
How Long Can Fermented Foods Safely Last Once Completed and Properly Stored?
You’ll find your fermented foods last months or years when properly stored. Your shelf stability improves with correct packaging methods. You’ll notice flavor evolution and nutrient retention continue, making them safer longer than fresh alternatives.
Can I Reuse Fermentation Brine or Starter Culture From Previous Batches?
You can reuse your brine and starter culture from previous batches. For brine reuse, make sure it’s clean and properly stored. With starter maintenance, you’ll keep your cultures active and viable for multiple fermentation projects.
What’s the Cost Difference Between Fermenting at Home Versus Buying Commercially?
You’ll save substantially fermenting at home once you’ve covered initial equipment costs. Your ingredient sourcing expenses are minimal compared to commercial prices, making homemade fermentation economical long-term despite upfront investment.
How Do I Scale Recipes up or Down for Different Batch Sizes?
You’ll adjust your scale ratios proportionally to your batch size. Maintain consistent ingredient density by measuring salt and starter cultures as percentages of your vegetable weight, ensuring you’re scaling everything uniformly.
Are There Any Fermented Foods I Should Avoid Making as a Beginner?
You’d surprisingly find that soft cheeses and alcohol ferments aren’t beginner-friendly. They’re notoriously tricky, requiring precise temperature control and specialized equipment you’ll likely lack starting out.
Conclusion
You’ve got this! Starting your fermentation journey isn’t rocket science—it’s actually pretty forgiving. Consider Sarah, who forgot about her sauerkraut for two weeks but ended up with this tangy, complex flavor she couldn’t replicate intentionally. That’s the beauty of fermentation: you’re working with nature, not against it. So grab those jars, trust the process, and prepare for some seriously delicious discoveries in your kitchen.


