
You’re probably leaving juice behind without realizing it. Start by prepping produce correctly—rinse thoroughly, cut to the right size, and feed strategically. Hard items like carrots go first to build momentum, then alternate with softer stuff to prevent clogs. Bundle your leafy greens tightly and feed ’em slow. The real magic happens when you layer thoughtfully, using structural support from firmer produce to push delicate fruits through smoothly. Patience beats forcing every time, and consistent maintenance keeps your machine running at peak performance, so you’ll extract noticeably more juice than you’re getting now.
Key Takeaways
- Cut produce into uniform, consistent pieces sized appropriately for smooth feeding and maximum extraction efficiency.
- Alternate soft and hard items in layers to prevent jams and optimize juice yield from the machine.
- Feed produce slowly and steadily without forcing, allowing the auger to process thoroughly for better extraction.
- Bundle leafy greens tightly and compress before feeding to improve movement through the auger and extraction.
- Maintain your juicer regularly by cleaning removable parts immediately and inspecting gaskets to preserve performance.


Prepare Your Produce Properly

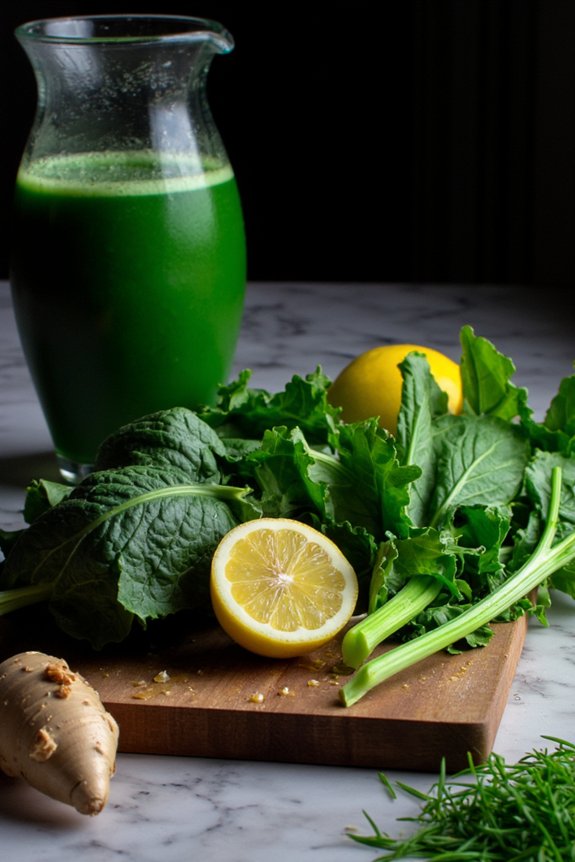
Before you start jamming produce into your masticating juicer, you’ll want to prep everything properly—trust me, it makes a huge difference. First things first: rinse thoroughly under cool water to remove dirt and any chemical residue that might’ve collected on the skin. You don’t want that stuff ending up in your juice. Next, trim stems from leafy greens and remove any bruised spots that could affect flavor. For harder produce like carrots or apples, you can leave the skin on since masticating juicers handle it great. Just cut everything into chunks your juicer can actually handle without choking. Smaller pieces feed more smoothly through the chute. Taking these few minutes upfront saves you frustration and guarantees better juice quality. It’s worth the effort. If your juicer has a large feed chute, you can reduce prep time even further by juicing whole fruits and vegetables without the need for extensive chopping.
2. Understand the Optimal Feeding Order

When you’re feeding produce into your masticating juicer, you’ll want to start with the hard stuff like carrots, beets, and apples—they’ll help establish a good grinding rhythm and won’t get stuck. Save your leafy greens like spinach and kale for last, since they’ll juice way better when the machine’s already warmed up and working smoothly, plus you can use those harder pieces you’ve already processed to help push ’em through more efficiently. Just like power and heating speed matter for optimal juicer performance, the order in which you feed your produce can maximize juice output and prevent jams.
Hard Produce First Strategy
Feed your hardest produce through the chute first, and you’ll set yourself up for way better juicing results. This strategy isn’t just about efficiency, it’s about protecting your machine and getting maximum yield from every ingredient.
| Produce Type | Best Position |
|---|---|
| Carrots, Beets | Feed first |
| Leafy Greens | Feed second |
| Soft Fruits | Feed last |
Hard vegetables push out residual moisture and create ideal pressure for your motor maintenance and noise reduction. When you reverse this order, soft produce gets jammed up, creating unnecessary strain. Your masticating juicer works smarter when you respect its design. Start with the tough stuff, then shift to delicate greens and fruits. You’ll notice smoother operation and way less cleanup frustration afterward.
Many masticating juicers use dual-layer mesh strainers to achieve higher yields and better nutrient preservation, especially when following the optimal feeding order.


Leafy Greens Last Method
So here’s the thing about leafy greens—they’re basically the opposite of those hard carrots and beets you just ran through. You’ll want to save spinach, kale, and lettuce for last in your juicing sequence. Why? Because these delicate leaves actually need a little help getting through your masticating juicer.
Here’s your strategy: try leafy stacking, which means bundling your greens together tightly before feeding them in. This technique helps them compress better and move smoothly through the auger. Before you start, consider stem trimming on tougher varieties like kale—removing those woody stems makes processing way easier.
Push your leafy bundles slowly and gently. No rushing. Let your juicer do the work, and you’ll get way better extraction without clogging things up. Your greens’ll thank you with maximum juice yield.
For best results, remember that removable, dishwasher-safe parts—like those on the top electric griddles—make cleanup much easier and help you maintain your juicer’s performance over time.
3. Cut Ingredients to the Right Size

Prep your produce before you feed it into the juicer, and you’ll have a much smoother experience. Most masticating juicers work best when you cut ingredients into uniform cubes or lengthwise wedges. This isn’t just about making things look neat—it actually matters for extraction. Smaller, consistent pieces feed through the machine more evenly, preventing jams and ensuring you’re getting every last drop of juice. Think of it like this: you wouldn’t toss a whole apple in there, right? Cut softer fruits into smaller chunks, maybe quarter-inch pieces. Harder vegetables like carrots and beets? Go for half-inch cubes. Leafy greens don’t need much sizing since you’re already putting them in last. Taking thirty seconds to prep properly saves you frustration and maximizes your yield. Just like with food-grade, BPA-free materials in steamers, using safe, uniform prep techniques helps protect your health and boosts the quality of your juice.
4. Master the Technique for Leafy Greens
When it comes to leafy greens, you’ll want to throw out everything you just learned about cutting produce into uniform pieces. Instead, you’re gonna bunch those leaves tightly together, creating what we call leafy compression. This technique’s essential because greens need that extra pressure to release their juice properly.
Feed your compressed bundle slowly into the chute. Don’t rush it. The masticating juicer’s auger will handle the green pulping process, breaking down those delicate leaves without creating a messy situation. You’ll notice the difference immediately—more juice, less pulp waste.
Think of it like this: tight bundles equal better extraction. Spinach, kale, lettuce, wheatgrass—they all benefit from this approach. Your juicer’ll work smarter, not harder, and you’ll get maximum yield every single time.
5. Extract Maximum Yield From Hard Vegetables

Hard vegetables like carrots, beets, and ginger require a different strategy than their softer cousins, and mastering this approach’ll transform your juicing game. You’ll want to cut these dense produce into smaller chunks, which maximizes contact with the masticating auger and boosts your juice yield notably.
| Vegetable | Prep Size | Speed Setting |
|---|---|---|
| Carrots | ¼-inch pieces | Medium |
| Beets | ½-inch chunks | Medium-High |
| Ginger | 1-inch pieces | High |
Before juicing, make certain proper produce sanitization by rinsing everything under cool water. This removes dirt and potential contaminants. The slower rotation speed of your masticating juicer actually helps with fiber retention, meaning you’re getting more nutritional bang for your buck. Feed items steadily without forcing them through, letting the machine do its thing naturally.
6. Handle Soft Fruits and Berries Effectively
Soft fruits and berries need a different game plan than those tough root veggies, so you’ll want to layer them with harder produce to keep things moving smoothly through your juicer. Try sandwiching your delicate berries between leafy greens or citrus pieces, which’ll help push everything through without creating a jammy mess that clogs up the works. If you’re working with frozen fruit, let it thaw slightly first and feed it slower to avoid overwhelming your machine and getting less juice than you’re hoping for.


Layering Technique for Berries
You’ll often get the best results by layering your berries instead of just tossing them all in at once. This berry stratification method works wonders for juice extraction. Here’s why: when you alternate berries with firmer produce like apples or carrots, you create natural pressure that helps break down those delicate fruits. Temperature control matters too—keep your berries chilled before juicing, and they’ll hold their structure better during processing. Start with a sturdy base layer, add your berries, then top with something solid. The masticating juicer works through the layers systematically, extracting more juice than if you’d just mixed everything together haphazardly. You’ll notice your yield improves noticeably, and honestly, it takes hardly any extra effort once you get the hang of it.
Frozen Fruit Processing Tips
Because frozen fruit can turn into a mushy mess if you’re not careful, there’s definitely a technique to mastering it in your masticating juicer. First, let them thaw slightly at room temperature for about ten minutes. You don’t want them rock solid, but you’re not aiming for completely soft either. That sweet spot makes all the difference.
Feed frozen berries slowly through the chute, alternating with harder produce like apples or carrots. This prevents jamming and keeps your juicer happy. For frozen smoothies, you’ll get better results mixing thawed fruit with fresh ingredients. Your machine handles softer items way better when there’s structural support involved.
Skip ice crushing mode—it’s not designed for extended frozen processing. Patience wins here. You’ll extract way more juice by going slow and steady than by forcing everything through at once.
7. Maintain Your Juicer for Peak Performance
Regular maintenance keeps your masticating juicer running like a dream instead of turning into a paperweight gathering dust in your cabinet. You’ll want to establish a consistent cleaning schedule right after each use, because dried pulp hardens like concrete and becomes a nightmare to remove later. Rinse all removable parts immediately under warm water and use a soft brush for the auger and strainer basket. Don’t forget the gasket inspection either. Check that rubber seal regularly for cracks or wear, since a damaged gasket’ll cause leaks and reduce efficiency. Every few months, run some warm water through the machine without produce. It’s basically a spa day for your juicer. These simple habits make certain your machine stays in top shape, giving you consistently excellent juice extraction for years.
8. Store and Use Your Fresh Juice Wisely
Fresh juice doesn’t stick around forever, so it’s important to know how to store it properly and drink it at the right time. Your freshly pressed juice is best consumed immediately, but that’s not always realistic. For cold storage, pour your juice into airtight glass containers and refrigerate right away. You’ve got about 72 hours before quality starts declining, though rapid consumption within 24 hours keeps nutrients at their peak. Freezing’s another solid option if you’re planning ahead—it’ll last months. Just leave a little headspace in containers since juice expands when frozen. Here’s the thing: the longer juice sits, the more enzymes break down and flavor fades. So drink up sooner rather than later, and you’ll taste the difference.
Frequently Asked Questions
What Is the Difference Between Masticating and Centrifugal Juicers?
Masticating juicers operate at slower motor speeds, producing less noise and higher juice yields. Centrifugal juicers spin faster, creating more noise but working quicker, though you’ll extract less juice overall.
How Long Does Fresh Juice From a Masticating Juicer Stay Fresh?
Your masticating juicer’s juice typically stays fresh for 24-72 hours when refrigerated. You’ll notice flavor degradation and enzymatic browning over time. Proper storage methods in airtight containers slow oxidation substantially.
Can I Juice Frozen Fruits and Vegetables in My Masticating Juicer?
You can juice frozen fruits and vegetables, but you’ll get better texture preservation by thawing them first. Your masticating juicer works more efficiently with thawed produce, yielding maximum juice extraction and preventing potential motor strain.
What Vegetables Produce the Most Juice Yield Overall?
You’ll get the highest juice yield from root vegetables like carrots and beets. Leafy greens won’t produce as much liquid, but they’re nutrient-dense. Combine both for best results with your masticating juicer.
Is Pulp Removal Necessary Before Juicing Certain Produce Types?
You don’t need pulp removal beforehand, but your peel preference matters for certain produce. Handle seeds carefully—remove them from apples and stone fruits first to protect your juicer and improve juice quality.
Conclusion
You’ve got this! With the right prep and technique, you’ll squeeze every drop of goodness from your masticating juicer. Remember to feed your produce strategically, handle those leafy greens like you mean it, and keep your machine clean. Fresh juice’s waiting for you, and honestly, once you nail these tips you’ll wonder how you ever juiced any other way. Happy extracting!


