
Your stand mixer’s a workhorse, but it can turn into a crusty mess if you’re not careful about cleanup. You’ve got to act fast after mixing, because dried dough’s basically concrete once it hardens. The tricky part? Figuring out what actually comes off and what doesn’t, plus knowing which pieces can handle the dishwasher without getting damaged. Let’s break down the right way to keep that machine running smooth.
Key Takeaways
- Remove bowl, whip, dough hook, and paddle by twisting and lifting for easy access to all surfaces.
- Rinse attachments immediately under warm water and use a scraper to remove stubborn residue while soft.
- Hand-wash coated bowls and plastic accessories with warm soapy water to avoid dishwasher damage.
- Soak dried-on residue in warm water, then scrub with baking soda paste in circular motions.
- Lubricate gears every six months and store the mixer in a dry environment to extend lifespan.

Disassembling Your Mixer: What Comes Apart and What Stays Put

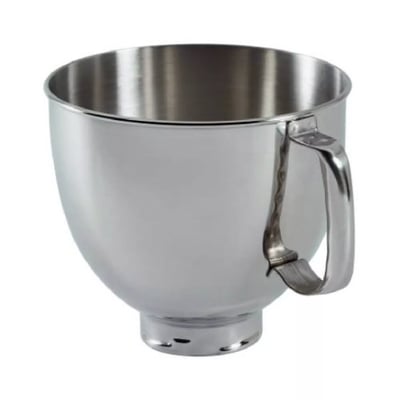
Before you plunge into washing, you’ll want to take apart your mixer—but don’t worry, it’s way easier than it sounds. The bowl, whip, dough hook, and paddle all come right off without any fuss. Just twist and lift, and they’re free. The removable splashguard detaches too, which is super convenient for cleaning. Now here’s what stays put: that sealed motorhead isn’t going anywhere, and honestly, you don’t want it to. It’s the heart of your machine, so leave it alone.
The key is knowing your mixer’s anatomy. Everything that touches your ingredients comes apart easy. Everything that powers your mixer stays locked down tight. Once you’ve separated what needs separating, you’re ready for the actual cleaning part. It’s genuinely straightforward once you get the hang of it. For best results and to extend your mixer’s lifespan, hand washing attachments is often recommended rather than running them through the dishwasher.
Immediate Cleaning: Best Practices Right After Use

Right after you finish mixing, jump on cleanup while everything’s still fresh and hasn’t had time to harden into concrete. Rinse promptly under warm water to prevent dried-on gunk from becoming your worst enemy. Use a scraper to gently remove stubborn bits stuck to the bowl’s sides and bottom. Don’t let that stuff sit around. Work quickly while residue’s still soft, and you’ll save yourself major frustration later. For the attachments, a similar approach works great. Rinse each one separately and scrape away any clinging dough or batter. Your future self will thank you for tackling this immediately rather than discovering a crusty nightmare hours later. Just like with proper seasoning and maintenance for cast iron cookware, addressing messes quickly helps extend the life and performance of your stand mixer equipment.
Dishwasher-Safe vs. Hand-Wash Only Components

Once you’ve rinsed everything down, you’ll need to know which components can actually handle the dishwasher and which ones need the gentle hand-wash treatment. Most stainless steel bowls are totally dishwasher-safe, but here’s the thing: coated bowls and certain plastic accessories aren’t always your friend in there. The heat and harsh water jets can damage protective coatings and cause BPA concerns if you’re using older plastic pieces. Hand-washing these components takes maybe two minutes, honestly. You’ll avoid water spots on shiny surfaces too, which keeps your mixer looking fresh. Check your manual first because different models vary. When in doubt, stick with warm soapy water and a soft cloth, and you really can’t go wrong protecting your investment. For even easier cleanup, look for dishwasher-safe parts in your mixer’s description, just like you would when choosing a top-rated blender.

Tackling Stubborn, Dried-On Residue

Sometimes even the best hand-washing technique won’t budge that crusty stuff stuck to your bowl or dough hook, especially if batter’s been sitting there for a while. Don’t worry, you’ve got options. Fill your bowl with warm water and let it soak for fifteen minutes or so. This softens everything up nicely. Then grab some baking soda and sprinkle it directly on the dried spots. The mild abrasiveness works wonders without scratching your mixer’s surface. For really stubborn bits, you can use steel wool, but go gentle—you’re cleaning, not sanding. Mix the baking soda with a little water to create a paste, scrub in circular motions, and rinse thoroughly. Your attachments’ll look brand new again. For best results and to protect your equipment, make sure to store scale away from moisture and extreme temperatures after cleaning.
Maintenance Tips to Extend Your Mixer’s Lifespan
Beyond keeping your mixer clean, a little preventive maintenance goes a long way in keeping that workhorse running smoothly for years to come. You’ll want to follow a regular lubrication schedule to keep those gears happy and prevent annoying squeaks. Store your mixer in a dry storage environment away from humidity and temperature swings, which can damage internal components over time. For other kitchen appliances, following the recommended warranty length helps signal durability and ensures long-term performance.
| Maintenance Task | Frequency |
|---|---|
| Check power cord | Monthly |
| Lubricate gears | Every 6 months |
| Inspect attachments | Before each use |
Don’t ignore small problems either. A weird noise or slight resistance means something needs attention before it becomes a bigger headache. Your stand mixer’s been through countless batches of dough and frosting, so show it some love and it’ll keep performing like a champ.
Frequently Asked Questions
How Often Should I Clean My Stand Mixer Bowl and Attachments?
You should clean your stand mixer bowl and attachments after every use to prevent buildup. For peak maintenance, you’ll want to do a weekly deep clean to make sure everything stays in top condition.
Can I Use Abrasive Scrubbers on Stainless Steel Mixer Bowls?
You shouldn’t use abrasive scrubbers on your stainless steel mixer bowl. They’ll scratch and damage the surface. Instead, use soft cloths and gentle cleaning methods to maintain finish care and keep your bowl looking new.

What’s the Best Way to Dry Mixer Attachments to Prevent Rust?
You should air dry your attachments completely, then apply a thin oil coating to prevent rust. Store them in a dry place. This method protects metal components from moisture and oxidation effectively.
Is It Safe to Soak Mixer Parts in Water Overnight?
You shouldn’t soak mixer parts overnight. Extended water exposure creates soaking risks like rust and corrosion. You’ll risk gasket damage too, compromising seals. Instead, hand-wash parts immediately after use and dry them promptly.
How Do I Remove Mineral Deposits From My Mixer Bowl?
You can remove mineral deposits by soaking your bowl in white vinegar for 30 minutes, then scrubbing with a lemon rub. For stubborn buildup, let it sit longer or use a paste of vinegar and baking soda.
Conclusion
You’ve got this. Clean your mixer right after you use it, and you’ll save yourself a heap of trouble down the road. Quick rinses beat stuck-on messes every time. Know what’s dishwasher-safe and what isn’t, handle stubborn spots with patience, and you’re golden. Your stand mixer’ll keep running smooth for years if you treat it right. It’s really that simple.


