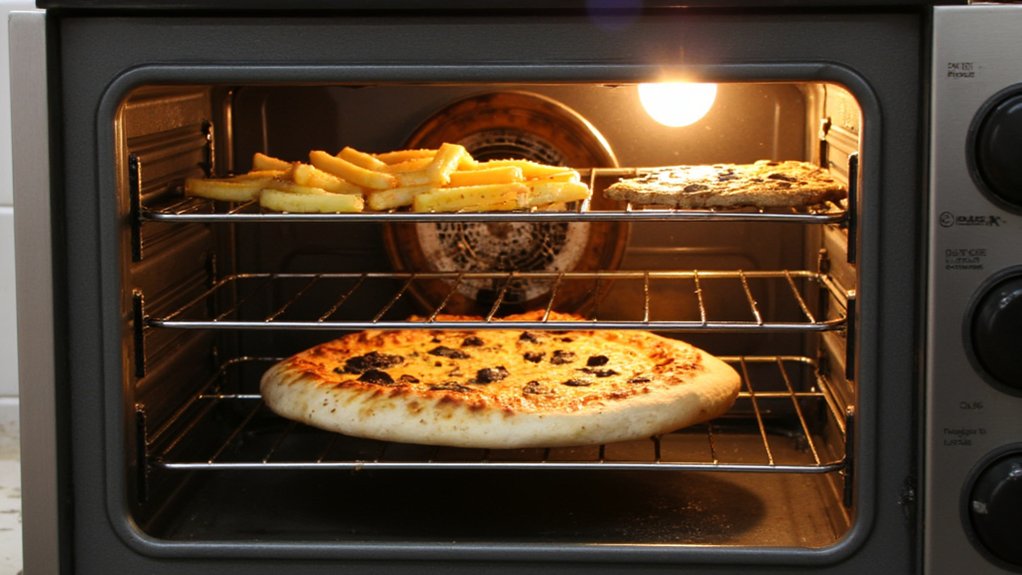
Your toaster oven’s rack position isn’t just a minor detail—it’s everything. The top rack runs 15–25°F hotter and browns food 25–30 percent faster, which means your cookies might char while centers stay raw. The middle rack? That’s your reliable sweet spot for balanced heat and predictable results. The bottom rack cooks gentler, perfect for crispy bottoms without burnt tops. Here’s the kicker: stacking multiple racks creates airflow cascades that mess with neighboring positions, so spacing and rotation matter more than you’d think. There’s actually a science to getting it right.
Key Takeaways
- Top racks run 15–25°F hotter and brown food 25–30% faster, requiring reduced cooking times and close monitoring.
- Middle rack provides balanced, predictable results matching standard recipe times with minimal adjustments needed.
- Bottom rack cooks slower but enhances bottom crispness while retaining interior moisture better than upper positions.
- Multiple loaded racks create airflow cascades; staggered positioning and rotation mitigate uneven heat distribution between levels.
- Every oven behaves uniquely—test identical dishes at different heights and keep notes to identify your optimal positions.


How Convection Air Circulation Changes With Rack Height

When you’re figuring out where to stick your food in a convection toaster oven, the rack position matters way more than you’d think. See, the heating element and fan work together to create convective currents that move differently depending on height. Your top rack? That’s where things get toasty fast because hot air rises and concentrates there. The middle position offers the most balanced cooking, which is why it’s often the sweet spot for even browning. Understanding airflow mapping helps you predict how your food’ll cook. Lower racks catch less direct heat, making them ideal for delicate items that need gentler treatment. So basically, you’ve got options, and knowing how air moves at each level means you’re not just guessing anymore. The number of rack positions available can also expand your cooking flexibility, letting you stack dishes or adjust for different recipes just like the best convection toaster ovens on the market.
The Top Rack Problem: Why Your Food Burns Faster Than Expected

When you use the top rack, you’re basically putting your food in the hot seat—literally—because it’s sitting way closer to the heating elements than anything else in the oven. You’ve probably noticed that your toast gets dark and crispy on top while staying pale underneath, which happens because of uneven heat distribution combined with that proximity issue. The convection fan’s doing its job circulating air, but when you’re that close to the element, the intense radiant heat overpowers everything else and your food just can’t catch a break. Some toaster ovens offer multiple rack positions to give you more flexibility, letting you avoid the top rack trap and cook different foods more evenly.
Uneven Heat Distribution
If you’ve ever pulled a tray out of your convection toaster oven only to find the top perfectly golden while the bottom’s still pale, you’ve met the top rack problem. Here’s what’s happening behind the scenes: your oven’s creating airflow vortices that concentrate heat unevenly throughout the chamber. These swirling air patterns, combined with thermal stratification—where hot air rises and cooler air sinks—mean the top rack’s basically getting blasted while lower racks get neglected. The heating element’s contribution mixes with those circulating vortices, creating zones of intense heat and cooler pockets. You’re not imagining it. Your food genuinely experiences different temperatures depending on where you position it. Understanding this uneven distribution helps you rotate trays and adjust rack placement strategically. Just like with cooking surface size and capacity on indoor electric grills, knowing how heat distributes in your oven empowers you to avoid burnt tops and underdone bottoms.

Proximity to Elements
The top rack sits dangerously close to your heating element, and that proximity is basically a one-way ticket to burnt edges and charred spots. You’re dealing with serious radiant intensity up there, which means your food gets hammered from above while convection’s doing its thing elsewhere in the oven.
| Rack Position | Element Proximity | Heat Intensity |
|---|---|---|
| Top | Very Close | Extreme |
| Middle | Moderate | Balanced |
| Bottom | Far | Gentle |
| Lower-Middle | Minimal | Controlled |
Your element proximity determines everything about how fast things cook. The closer you get to that heating coil, the more aggressive the heat becomes. That’s why your cookies burn on top but stay doughy underneath. Smart move? Stick with middle or lower-middle racks for most stuff.
If you’re using appliances with precise temperature control, you can better manage heat distribution and reduce the risk of burning your food on the top rack.
Understanding the Sweet Spot: Why the Middle Rack Isn’t Always Your Answer

Most home bakers and cooks assume the middle rack is a one-size-fits-all solution, but here’s the thing: your convection toaster oven’s sweet spot depends on what you’re actually cooking. Understanding airflow patterns in your specific oven makes all the difference between golden perfection and disappointing results.
Consider these factors when positioning your food:
- Heat intensity needed – Delicate pastries require gentler zones away from direct element exposure, while crusty breads actually benefit from proximity to heating sources.
- Airflow circulation – Convection works best when hot air can circulate freely around your dish, so sometimes lower positions work better than expected.
- Recipe adaptation – Cookies might need the upper rack while roasted vegetables thrive lower down.
The real trick? Experiment with your specific model. Your oven’s personality matters more than conventional wisdom. For best results, consider multi-level cooking capability to maximize air circulation and ensure even heat distribution across different recipes.
Bottom Rack Positioning and Its Effect on Crust Development

Now here’s where things get really interesting: you’re ready to move beyond finding your oven’s general sweet spot and focus on one of the most powerful tools at your disposal—the bottom rack.
When you position your food on the bottom rack, you’re basically saying “give me maximum heat from below.” This is your golden ticket for bottom crispness. Think pizza, cookies, or anything where you want that satisfying crunch underneath.
The magic happens because heat radiates upward from the heating element, and your food catches it head-on. You’ll also benefit from steam retention, since the lower position traps moisture better, creating that perfect balance between crispy exteriors and tender insides.
Just watch your cooking times—things move faster down there.
Temperature Variations You’re Not Measuring Between Different Rack Levels

If you’ve been assuming your convection oven heats equally across all rack levels, you’re in for a surprise. Here’s the thing: your oven’s got hot spots you can’t see. Air stratification means warm air rises and collects at the top, while cooler zones settle below. Those thermal gradients aren’t random either, they’re predictable once you know what’s happening.
- Upper racks experience roughly 15-25 degrees more heat than lower positions due to rising hot air
- Middle racks offer the most stable temperatures, making them ideal for even baking and roasting
- Bottom racks stay notably cooler, which actually helps when you’re preventing over-browning
Understanding these invisible temperature differences means you’ll stop guessing and start cooking smarter. Your baking results will improve dramatically once you account for what you can’t measure.
Spacing Matters: How Close Racks Are to Heating Elements Affects Outcomes
The distance between your rack and the heating elements is basically the invisible hand controlling how fast your food cooks. You’ve probably noticed your toast burns on top but stays pale underneath, right? That’s element proximity working against you. When you’re too close to the heating elements, you’re basically asking for uneven results and charred edges.
| Rack Position | Distance from Element | Best Use |
|---|---|---|
| Top | 2-3 inches | Broiling, melting |
| Middle | 4-5 inches | General baking |
| Lower | 5-6 inches | Longer cooking |
| Bottom | 6+ inches | Delicate items |
| Custom | Variable | Experimenting |
The thing is, your airflow patterns change dramatically depending on spacing. Closer racks trap heat, while distant ones let air circulate better. You’re not just picking a level; you’re engineering your cooking environment.


The Domino Effect: How One Rack Position Influences Adjacent Racks
When you’ve got multiple racks loaded up in your convection toaster oven, you’re basically playing a game of heat musical chairs where every position affects its neighbors.
Here’s the thing: that middle rack you’re using isn’t just chilling there solo. It’s creating an airflow cascade that changes how heat reaches everything around it. Placing a full sheet pan on one level blocks thermal shielding for the rack below, meaning that pizza’s gonna cook differently than you planned.
- Lower racks get less direct heat when upper racks are packed, forcing uneven browning across your food
- Dense items like casseroles create bigger disruptions than lighter stuff, altering circulation patterns markedly
- Staggered positioning beats alignment, letting hot air move freely between levels
Think strategically about what goes where, and you’ll nail it.
Adjusting Cooking Times Based on Your Chosen Rack Position
When you’re cooking on the upper rack, you’ll want to shave a few minutes off your usual time since that spot gets hit with more intense heat, and conversely, lower rack positions need a bit longer to work their magic. The middle position is your golden ticket—it’s basically the standard setting that most recipes are written for, so you can usually follow instructions as-is without playing guessing games. Just remember that every oven’s got its own personality, so a little experimentation with timing will help you nail down what works best for your particular machine.
Upper Rack Heat Intensity
Position your food on the upper rack and you’re basically inviting faster, more intense cooking to the party. The radiant intensity up there is no joke—you’re closer to the heating elements, so things get crispy quicker. Here’s what you need to know:
- Heat concentration increases markedly closer to the top, speeding up browning by roughly 25-30 percent
- Plume dynamics shift as hot air circulates differently, creating spotty cooking if you’re not careful about rotation
- Your baking times might shrink by 5-10 minutes depending on what you’re making
You’ll want to keep a closer eye on your food. Check on it halfway through cooking because that upper rack heat intensity doesn’t play around. It’s perfect for finishing dishes, but watch it like a hawk to avoid burnt edges and raw centers.
Lower Rack Timing Adjustments
Since you’re dropping your food on the lower rack, you’re playing a totally different cooking game than the upper tier crowd. The heat’s less intense down there, which means you’ll need to add extra time to your cooking. We’re talking anywhere from five to ten minutes longer, depending on what you’re baking or roasting. Your oven’s airflow mapping works differently at lower positions, so don’t just copy the recipe’s suggested time and expect perfection. You’ll want to do some thermal calibration by checking your food earlier than usual. Start peeking at your meal around the three-quarter mark of the original time. Yeah, it’s a bit more fussing around, but it beats pulling out burnt edges or underdone centers. Trust the process.
Middle Position Standard Guidelines
If you’ve got your food chilling in the middle of your convection toaster oven, congrats—you’ve basically found the sweet spot. This position works like magic because the airflow patterns distribute heat evenly from all directions, meaning you’re less likely to end up with burnt edges and a cold center.
Here’s what you need to know:
- Most recipes don’t need tweaking when you use the middle rack, though recipe adaptation might help if you’re experimenting with new dishes
- Your cooking time stays pretty consistent, usually matching what the original instructions suggest
- You’ll get better browning and more predictable results compared to other positions
The middle rack is honestly your safest bet for achieving those golden, evenly cooked results without constantly peeking inside.
Practical Experiments to Find Your Oven’s Ideal Rack Positions
Every oven’s got its own personality, and the only real way to figure out where yours works best is to roll up your sleeves and do a little testing. Start by doing some airflow mapping with a simple slice of bread on different racks. Toast it, note where it browns fastest, then adjust accordingly. Pay attention to sensor placement too—many convection ovens have heating elements that distribute heat unevenly depending on rack height. Try cooking the same dish at your oven’s middle position, then upper and lower positions on separate days. Keep notes about cooking times and results. You’ll quickly discover which rack positions give you golden, evenly cooked food versus sad, uneven results. This hands-on approach beats any guidebook.
Frequently Asked Questions
Can I Use Multiple Rack Positions Simultaneously Without Ruining My Dishes?
Yes, you can use multiple rack positions simultaneously. However, you’ll need to understand airflow dynamics and temperature gradients. Upper racks get hotter; lower racks cook slower. Rotate dishes halfway through for even results.
Does Rack Position Affect Energy Efficiency and Cooking Time Duration?
Yes, rack position notably affects both. You’ll notice higher positions reduce cooking time through better airflow patterns, while lower positions increase it. However, higher placement causes more insulation loss, negating energy efficiency gains.
How Do Convection Toaster Ovens Differ From Standard Ovens Regarding Rack Placement?
You’ll find that convection toaster ovens require more careful rack positioning than standard ovens because their compact cavity and tight airflow dynamics mean improper placement can markedly block circulating hot air, reducing cooking efficiency.
Should I Rotate Food Between Racks During Cooking for Even Results?
You should rotate food between racks, but rotate frequency depends on your oven’s hot spots. Maintain proper food spacing to guarantee even heat circulation and consistent cooking results throughout.
What’s the Safest Rack Position for Reheating Leftovers Without Drying Them?
You’ll want the middle or lower-middle rack for reheating leftovers. Use low heat with a foil tent or steam cover, checking at short intervals to prevent drying while keeping moisture intact.
Conclusion
Look, you’ve gotta stop guessing with your convection toaster oven. Those rack positions aren’t just suggestions—they’re game-changers. Run some quick tests with your actual oven, jot down what happens, and you’ll crack the code. Every oven’s got its own personality, and once you figure out yours, you’re basically a toaster oven ninja. No more burnt edges or soggy middles. Just perfectly cooked food, every time.


