
Start with single-origin beans and use a burr grinder for coarse grounds—think breadcrumb texture. Mix about 50g coffee to 200g water, ensuring everything’s fully saturated, then seal it up and let it steep for 16–24 hours in a cool spot. The magic happens with patience, honestly. After steeping, strain through a fine mesh filter or cloth to catch sediment and oils that’d make it bitter. Store your concentrate in an airtight glass container in the fridge for up to two weeks, then dilute with water or milk when you’re ready to sip. Stick around to discover the filtering tricks that’ll really transform your brew.
Key Takeaways
- Use coarsely ground coffee from a burr grinder at a 1:4 coffee-to-water ratio for consistency and smooth extraction.
- Steep for 16–24 hours in a cool location to achieve balanced flavor without over-extraction or bitterness.
- Filter through metal mesh, cloth, or paper filters to remove sediment while preserving oils for richness.
- Store the finished cold brew in airtight glass containers refrigerated for up to two weeks.
- Serve chilled over ice, optionally diluted with water or milk, and sweetened to taste.


Choose the Right Coffee Beans

Bean selection—it’s honestly where everything starts. You’ve got tons of options, and picking the right ones makes a huge difference in your final cup. Single origin beans are fantastic if you want to taste what a specific region brings to the table. Light roast coffees work really well for cold brew because they’re less bitter and let those subtle flavors shine through. Now, if you’re feeling adventurous, flavored blends can add some fun complexity to your brew. And hey, if you care about that stuff, organic options are totally available too. The key is experimenting until you find what makes your taste buds happy. Don’t overthink it—just grab something that sounds good and see how it goes. For even smoother results, consider how brew method and speed can affect the flavor extraction from your chosen beans.
2. Get the Coffee-to-Water Ratio Correct

Now that you’ve found beans you’re actually excited about, it’s time to nail down the ratio—because let’s face it, dumping random amounts of coffee and water into a jar isn’t exactly a recipe for success. The sweet spot? Try one part coffee to four parts water, though you can adjust based on how strong you like it. This ratio optimizes your brewer’s yield and makes certain solid extraction efficiency. Use a kitchen scale if you’ve got one—it’s way more accurate than eyeballing it. Start with about 50 grams of coffee to 200 grams of water for a standard batch. Once you dial in your perfect ratio, you’ll get consistent results every single time, and that’s when cold brew gets really good. You’ll also want to make sure your cold brew coffee maker capacity fits your planned batch size so you don’t overfill or underuse your brewer.
3. Grind Your Coffee to the Proper Consistency

Getting your grind size right is where a lot of cold brew enthusiasts mess up, and honestly, it’s the difference between silky smooth coffee and something that tastes like you’re chewing on sand. You’ll want to use a burr grinder, not a blade grinder, because it gives you consistent particle distribution instead of a chaotic mix of dust and chunks. Aim for a coarse grind, kinda like breadcrumbs or sea salt. This matters because cold brew steeps slowly, so you need bigger particles that won’t over-extract and turn your brew bitter. A burr grinder lets you dial in that sweet spot where every particle’s roughly the same size, meaning balanced flavor and that smooth texture you’re after. For best results, choose a grinder with adjustable grind settings so you can fine-tune your particle size for the smoothest cold brew possible.


4. Master the Steeping Time

While your perfectly ground coffee’s sitting there waiting, the steeping time is where you’ll make or break your cold brew game. Ideal timing determines whether you’ll get that smooth, balanced cup or something that tastes like liquid regret.
Here’s what you need to know:
- 12 hours minimum for lighter, more delicate flavor extraction
- 16-24 hours hits that sweet spot for most folks
- Go longer if you prefer bold, concentrated cold brew
- Don’t exceed 48 hours or you’ll end up with over-extraction and bitterness
- Temperature matters – cooler spots mean slightly longer steeping
The magic happens gradually. Cold water extracts flavor differently than hot, pulling out the good stuff while leaving harsh compounds behind. Check your brew around the 12-hour mark, then taste it every few hours. You’ll find your personal sweet spot pretty quick. Trust your taste buds. If you plan to use a blender to mix or serve your cold brew, consider the jar capacity and size of your blender to avoid overflow and ensure even blending.
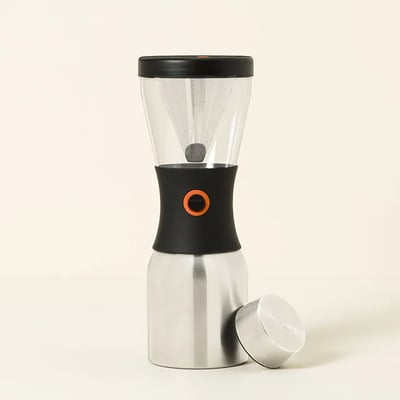
5. Strain and Filter for Maximum Smoothness

Now comes the fun part where you’ll actually separate your liquid gold from all that soggy ground coffee sitting at the bottom. You’ve got choices here—metal mesh filters let some oils through for that rich flavor, while paper filters catch more sediment but might strip out some of those good tastes, and honestly, most folks find a combo approach works best. We’ll walk you through double filtering and other tricks to get you that impossibly smooth cup without any gritty surprises. If you’re aiming for exceptional clarity, take a cue from removable spout filters used in top electric kettles, and try layering a fine mesh sieve with a paper filter for the best of both worlds—minimal sediment and maximum smoothness.
Choosing the Right Filter
What’s the secret to cold brew that doesn’t taste like you’re chewing on a mouthful of sand? The filter you choose makes all the difference.
Here’s what you should consider:
- Paper cones trap fine particles and oils for the cleanest cup
- Metal mesh filters let more flavor through but require careful pouring
- Cloth filters offer a nice middle ground between clarity and taste
- Micron rating matters – aim for 100 microns or finer
- Reusable options save money while reducing waste
Paper cones work great if you want that crystal-clear smoothness, filtering out sediment that’d otherwise ruin your sip. Metal mesh gives you bolder flavor since it allows more oils through, though you’ll need a steadier hand when pouring. Your choice depends on whether you’re chasing silky smoothness or rich, robust taste.
Double Filtering Technique
If you really want to take your cold brew from good to genuinely smooth, double filtering is where the magic happens. Here’s the thing: your first pour through a standard filter gets most of the sediment, but there’s still some fine stuff lurking around. That’s where sequential sieving comes in handy.
After your initial filtering, grab a fine mesh strainer or cheesecloth and go again. This double filtration process removes those stubborn micro-particles that make cold brew taste gritty. You’ll notice the difference immediately, trust me. The result is noticeably smoother, cleaner, and way more refined than single filtering alone. Yeah, it takes a couple extra minutes, but honestly? Worth it every time.
Sediment Removal Methods
Beyond that double filtering technique, there’s actually a whole toolkit of methods you can use to really dial in the smoothness of your cold brew.
Here’s what’ll take your cold brew from gritty to silky:
- Temperature decanting – Let your brew sit at room temperature before pouring to minimize turbulence and sediment disturbance
- Cheesecloth layering – Stack multiple layers for extra fine filtration without the mess
- Gravity-based straining – Pour slowly and let gravity do the heavy lifting instead of forcing it through
- Paper filters – They catch the tiniest particles that cloth sometimes misses
- Settling time – Patience pays off, so give those remaining particles a few hours to sink
The key’s turbulence minimization throughout the whole process. Don’t rush it. Your future smooth self’ll thank you.

6. Store and Serve Your Cold Brew Properly
Once you’ve got that smooth, delicious cold brew ready to go, storing it properly means you’ll actually get to enjoy it instead of watching it go bad in your fridge. Here’s the thing: airtight storage is your best friend. Grab a glass jar or bottle with a tight seal and keep your cold brew there for up to two weeks. Temperature matters too, so make sure it stays in the back of your fridge where it’s consistently cold.
When you’re ready to serve, think about chilled serving methods that’ll keep that smooth flavor intact. Pour it over ice, dilute with water or milk if you like, and maybe add a touch of sweetener. The beauty of cold brew? It’s super versatile and stays fresher longer than hot coffee, so you’re basically set.
Frequently Asked Questions
Can I Use Regular Hot Brew Coffee Maker Equipment to Make Cold Brew?
Yes, you can. You’ll want to use a French press or pour over dripper for cold brew. Both work well, though they’ll require longer steeping times—typically 12-24 hours—compared to dedicated cold brew makers.
How Long Does Homemade Cold Brew Stay Fresh in the Refrigerator?
Your homemade cold brew’s storage lifespan typically extends two to four weeks in the refrigerator. You’ll notice flavor degradation after the two-week mark, so you should consume it sooner for ideal taste quality.
What’s the Difference Between Cold Brew and Iced Coffee?
You’ll find cold brew uses extended steeping to extract flavor through coffee chemistry, honoring brewing tradition. Iced coffee’s quicker—you’re brewing hot coffee normally, then cooling it with ice.
Can I Make Cold Brew Concentrate for Multiple Servings?
Yes, you can definitely make cold brew concentrate for batch brewing multiple servings. You’ll want to use a 1:4 coffee-to-water storage ratio, then dilute it with water or milk when you’re ready to drink it.
Does Cold Brew Contain Less Caffeine Than Hot Brewed Coffee?
No, it doesn’t. You’ll find cold brew actually contains more caffeine because of its extended steeping time, which increases caffeine extraction. Your brew concentration matters—longer brewing pulls more caffeine into the water than hot methods do.
Conclusion
You’ve got this! Making smooth cold brew is honestly pretty straightforward once you nail those basics. Stick with quality beans, get your ratios right, and don’t rush the steeping process. Your patience pays off with that silky, delicious cold brew you’ve been craving. Now go brew something amazing and enjoy every sip of your homemade creation.


