So you’ve decided to master the smoothie bowl game—smart move. You’ve probably noticed that blending the perfect bowl isn’t like making your regular smoothie; it’s honestly a whole different beast. The consistency’s thicker, the texture matters way more, and yeah, you’ll need to know some actual techniques to nail it. Your blender choice and ingredient ratios are make-or-break decisions that’ll determine whether you’re sipping success or scraping disappointment.
Key Takeaways
- Use a high-torque motor (600W+) to effectively blend frozen fruits and ice without straining or overheating.
- Maintain soft-serve consistency by using 1 cup frozen fruit to 1/2 cup liquid, adjusting gradually as needed.
- Pulse frozen ingredients first, then blend liquids and soft items before adding frozen fruit for even processing.
- Layer thickest ingredients first for stability, then add colorful fruit sections and finish with crunchy toppings.
- Chill your bowl beforehand and use properly frozen, quality fruit to prevent melting and achieve creamy texture.

Choosing the Right Smoothie Maker for Bowl Blending

If you’ve ever tried blending frozen fruit in a regular blender and watched it struggle like it’s running a marathon, you’ll understand why picking the right smoothie maker matters. You’ll want a blender with a high torque motor—this is what actually powers through frozen stuff without giving up halfway through. Look for models featuring a wide feed chute so you’re not constantly stopping to break up your ingredients into tiny pieces.
A quality smoothie maker saves you time and frustration. You need something that won’t overheat or make weird grinding sounds. Consider wattage too. Higher wattage generally means better performance, especially when you’re working with thick, frozen bowls that demand serious blending power from your machine. For optimal results, choose a model with at least 600W of motor power, as this ensures smoother textures and better handling of ice and fibrous ingredients.
Understanding the Perfect Ingredient Ratio

Getting the ratio right is where smoothie bowls go from “meh” to actually delicious, and it’s way simpler than you’d think. You’ll want about one cup of frozen fruit, half a cup of liquid like yogurt or milk, and maybe a tablespoon of nut butter or protein powder. This gives you that thick, spoonable consistency that makes bowls so satisfying.
Portion control matters here because too much liquid turns your masterpiece into regular smoothie soup. Nobody wants that. For flavor pairing, consider how your ingredients complement each other—tropical fruits with coconut milk, berries with almond butter, that kind of thing. Start with these ratios and adjust based on what you’re going for. Your blender will thank you, and your taste buds definitely will. If you’re using dense or frozen ingredients, make sure your blender has sufficient motor power to handle them smoothly and avoid overworking the machine.
Selecting and Preparing Your Frozen Fruits
Now that you’ve got your ratios dialed in, it’s time to pick the right frozen fruits—because let’s be honest, the quality of your fruit is basically the whole show. Seasonal berries like blueberries, strawberries, and raspberries work great because they’re packed with flavor and affordable when they’re in season. Mangoes are your reliable go-to, especially CBD mangoes if you’re looking to add that extra wellness kick. Here’s the thing: freeze your own fruit whenever possible. Buy ripe bananas, slice them up, and toss them in freezer bags. Same goes for berries and peaches. Pre-frozen grocery store options work fine too, but homemade frozen fruit gives you way more control over quality. Just make sure everythings properly frozen before blending, or you’ll end up with a watery mess instead of that perfect creamy texture your bowl deserves. If you’re planning to add extra ingredients—like nuts or seeds—consider using a versatile grinder to achieve the perfect texture before topping your bowl.


Mastering Liquid Ratios for Ideal Consistency

The liquid-to-frozen-fruit ratio is where most smoothie bowls go wrong, and it’s honestly the make-or-break moment for your whole operation. Getting liquid dynamics right determines everything about your bowl’s texture and pourability.
Here’s how to nail viscosity control:
- Start with a 1:3 liquid-to-fruit ratio as your baseline—not too thin, not too thick
- Add liquid gradually, blending between each pour to test consistency
- Aim for soft-serve ice cream thickness, something that’ll hold its shape on your spoon
- Remember that frozen fruit releases moisture as it thaws, so go lighter than you think
You want your smoothie bowl thick enough to top without sliding everywhere, yet creamy enough that your blender won’t struggle. That sweet spot takes practice, but you’ll nail it. For the best results, using a high-performance motor ensures smoother blending and helps you reach that ideal creamy texture more efficiently.
Blending Techniques for Smooth, Creamy Results
Once you’ve nailed your liquid ratio, your blender technique becomes the difference between a silky, spoonable bowl and one that’s got weird chunks or an oddly grainy texture. Start by pulsing your frozen ingredients a few times before hitting the blend button. This prevents your blender from getting overwhelmed and guarantees even processing throughout.
Use cold emulsification by blending your liquids and softer ingredients first, then gradually adding frozen fruit and ice. It’s like building a foundation before stacking everything else on top. Pulse intermittently rather than running continuously, which helps maintain that creamy consistency you’re after.
Don’t forget about blade maintenance either. Keep those blades sharp and clean so they actually do their job properly. Dull blades create those frustrating grainy textures nobody wants. For even smoother results, use multi-blade assemblies as they can break down tough or frozen ingredients more efficiently than single-blade setups.
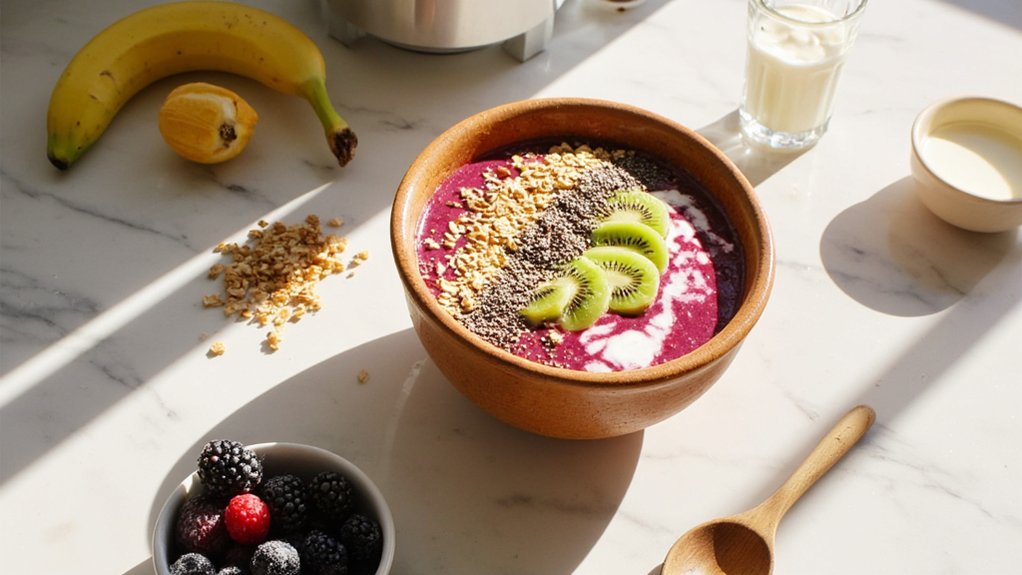
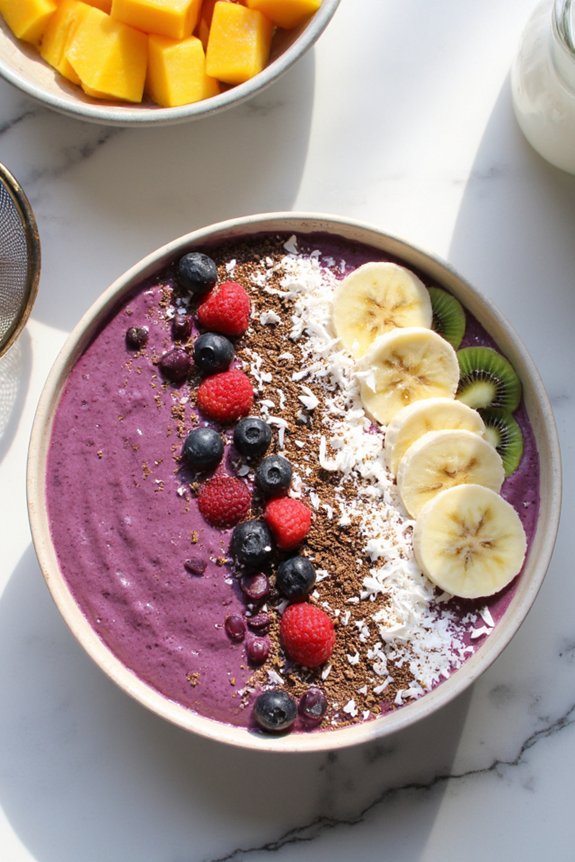
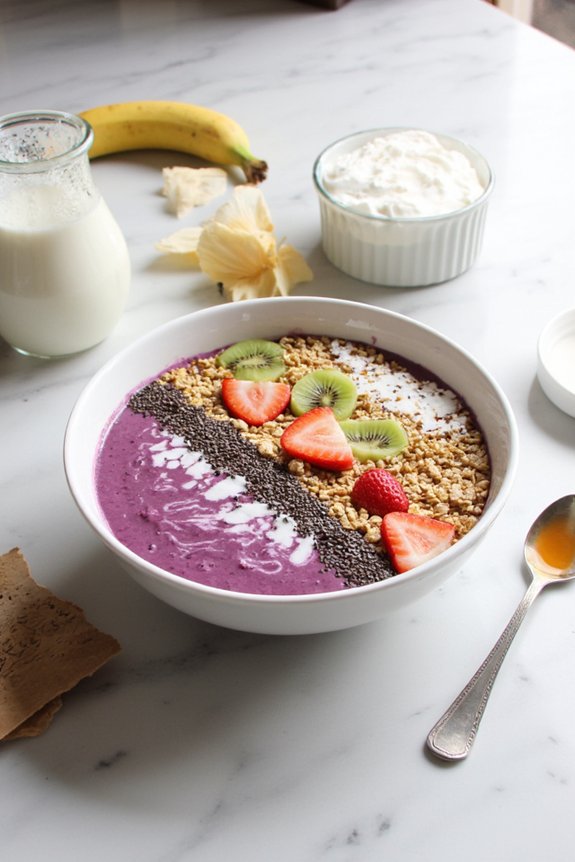
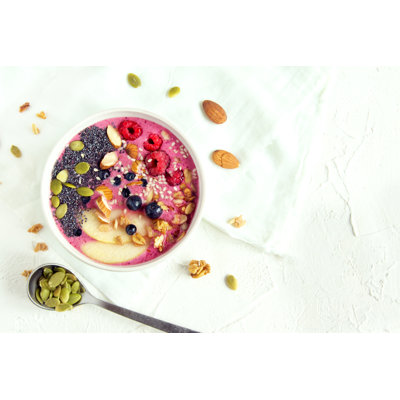
Layering and Topping Your Smoothie Bowl
After you’ve got that perfectly blended base, the fun part begins—because let’s be honest, a smoothie bowl is basically an edible canvas. Now comes the creative layering and topping strategy that’ll make your bowl Instagram-worthy and delicious.
- Start with your thickest layer first, spreading it evenly across the bottom for stability
- Add color contrast by layering fruits like berries, mango, or kiwi in distinct sections
- Use seasonal toppings that complement your base, like fresh strawberries in summer or pumpkin granola in fall
- Finish with crunchy elements like nuts, seeds, or granola for texture
The key’s balancing flavors and textures while keeping things visually interesting. Don’t overthink it—just play around and see what tastes good together. You’re basically creating your own edible masterpiece right there.
Troubleshooting Common Smoothie Bowl Problems
Even with the best intentions, smoothie bowls don’t always cooperate. You might end up with something too runny, too thick, or just plain disappointing. Don’t worry though, most issues are fixable with a few quick adjustments.
| Problem | Cause | Solution |
|---|---|---|
| Too Thin | Excess liquid | Reduce yogurt or milk |
| Too Thick | Not enough liquid | Add more milk gradually |
| Icy Texture | Frozen fruit overload | Use half-frozen ingredients |
| Melting Fast | Warm blender | Chill your bowl first |
Texture troubleshooting starts with understanding your ingredient ratios. If your bowl’s melting faster than you can eat it, try temperature adjustments by freezing your bowl beforehand. For that perfect consistency, you’re basically aiming for soft-serve ice cream texture. It should hold its shape but still be spoonable. Getting it right takes practice, so experiment and find what works for you.
Frequently Asked Questions

Can I Make Smoothie Bowls Without a High-Powered Blender?
You can make smoothie bowls without a high-powered blender, though you’ll need to work with thicker blends and chunk smoothies. A regular blender works fine if you’re patient and blend in batches, adding liquid gradually for better results.
How Long Do Smoothie Bowls Stay Fresh After Blending?
Your smoothie bowl’s shelf life is typically 24 hours when you’re using proper storage methods. You’ll want to refrigerate it immediately to prevent oxidation and texture changes. Keep it in an airtight container.
What’s the Best Time of Day to Eat Smoothie Bowls?
You’ll find the best times are mornings for morning digestion and post-workout recovery. Morning smoothie bowls jumpstart your metabolism, while post-workout versions replenish nutrients. You can’t go wrong with either timing.
Are Smoothie Bowls Suitable for People With Dietary Restrictions?
Yes, smoothie bowls work great for you if you’ve got dietary restrictions. You can easily make allergen substitutions and texture modifications to fit your needs perfectly.
Can I Prepare Smoothie Bowl Ingredients in Advance for Meal Prep?
Yes, you can easily prep ahead! Store your frozen fruit packs separately and use layered jars for other ingredients. You’ll keep everything fresh for up to five days, making morning blending quick and convenient.
Conclusion
You’ve got this! Now that you know the basics, you’re ready to whip up smoothie bowls that’d make any café jealous. Start simple, experiment with ratios, and don’t stress if your first attempt’s a bit runny or too thick—that’s literally how everyone learns. Pretty soon you’ll be blending like a pro, stacking those toppings high, and impressing yourself (and maybe your friends too). Have fun with it!


