You’ve probably set your dehydrator to whatever temperature the manual suggests, hit start, and hoped for the best. But here’s the thing—that number on your dial isn’t telling you the whole story. Temperature doesn’t just control how fast your food dries; it fundamentally changes what you’re actually preserving and what you’re losing in the process. And yeah, there’s a good chance you’re making a costly mistake right now.
Key Takeaways
- Your dehydrator likely runs hotter than its display shows; verify actual temperature with a reliable thermometer to prevent case hardening.
- Rapid outer-layer crusting traps interior moisture, creating bacteria breeding grounds despite appearing finished on the outside.
- Different foods need different temperatures—delicate herbs require 95–115°F while meat demands 160–170°F initially for safety, then 130–140°F minimum.
- Lower temperatures preserve nutrients and aroma but require significantly longer drying times; higher heat accelerates drying but degrades quality.
- Uneven airflow and moisture pockets in thicker pieces create microbial hotspots; temperature alone cannot guarantee safety without proper dehydrator maintenance.


Why Temperature Controls Enzyme Activity During Dehydration
When you’re dehydrating food, temperature’s doing way more than just removing moisture—it’s actually controlling how enzymes behave, and that’s pretty important stuff. You see, enzymes are basically tiny workers that speed up chemical reactions in your food, and they’re constantly trying to break things down. Here’s where it gets interesting: enzyme kinetics tells us that heat directly affects how fast these reactions happen. Crank up the temperature, and you’ll trigger thermal inactivation, which basically means you’re slowing down or stopping those enzyme reactions altogether. Lower temperatures? They let enzymes keep working, which isn’t always what you want. That’s why different foods need different heat settings. Get the temperature right, and you’ll preserve flavors, colors, and nutrients way better. Choosing a dehydrator with an adjustable temperature range ensures you can tailor the drying process to suit the specific needs of different foods, maximizing both safety and quality.
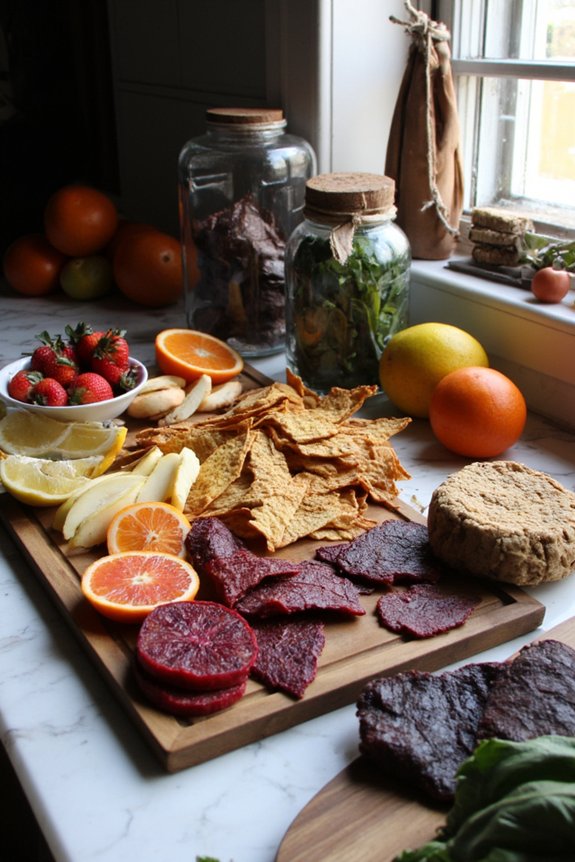
The Case Hardening Problem: What Happens When You Go Too Hot
If you’ve ever cranked up your dehydrator to speed things along, you’ve probably run into case hardening without even realizing it. This happens when your food’s outer layer dries too quickly, sealing in moisture inside. You end up with a rock-hard crust trapping liquid that’ll eventually spoil your batch.
| Temperature | Result |
|---|---|
| 95°F | Slow, even drying |
| 125°F | Ideal for most foods |
| 160°F | Rapid crusting begins |
| 180°F | Severe case hardening |
| 200°F+ | Completely ruined |
The problem’s sneaky. That rapid crusting looks like progress, but you’re actually creating a barrier that prevents proper moisture removal. Your apple slices seem done on the outside, yet they’re still chewy within. It’s frustrating and wastes your food. Just like heat retention and distribution in cast iron cookware, even and gentle temperature control is crucial for the best dehydrating results.
Low Temperature Drying and Why It Preserves Nutritional Value
Now that you know what happens when you crank up the heat, let’s talk about the opposite approach—and why it’s actually your secret weapon for keeping your food nutritious. Lower temperatures, typically between 105 and 135 degrees Fahrenheit, work magic on enzymatic retention. See, those heat-sensitive vitamins and enzymes? They survive better when you’re patient. You’re basically giving your food a gentle nudge toward dryness rather than blasting it into submission. This approach supports nutrient stability, meaning your kale chips and apple slices hang onto their nutritional punch way better. Sure, it takes longer, and yeah, you’ll need more patience. But you’re getting food that’s actually good for you, not just shelf-stable. Using lower temperatures is similar to the gentle steam cooking method, which preserves both nutrients and flavor by avoiding harsh heat.


How Different Foods Require Dramatically Different Heat Levels
You’ll quickly discover that not all foods play by the same rules when it comes to heat, and that’s where things get interesting. Delicate herbs need lower temperatures—think around 95 to 115 degrees—so you don’t cook away all those flavor compounds, while meat demands maximum temperature control at 160 degrees or higher to safely eliminate any nasty bacteria that might be hiding in there. The trick is matching the right temperature to what you’re drying, because one setting definitely doesn’t fit all. If you’re looking for a convenient way to keep your dehydrator clean and functioning well, consider models with dishwasher-safe components to simplify maintenance between batches.
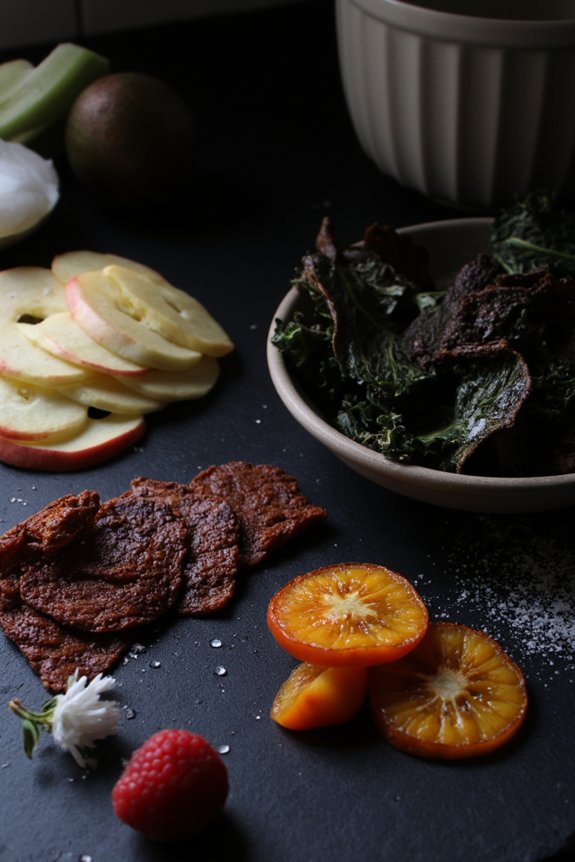
Delicate Herbs Need Lower Heat
When it comes to herbs, cranking up the heat is basically asking for trouble. You’ve got delicate plant material here, and high temperatures will obliterate everything that makes herbs worthwhile. The herb fragility is real. We’re talking about losing those precious oils that give your basil, oregano, and thyme their character.
Here’s what you need to know:
- Set your dehydrator between 95°F and 115°F for best results
- Lower temps preserve aroma retention way better than aggressive heat
- Herbs dry faster than you’d think at these settings
- Check them frequently to prevent over-drying and brittleness
- Store in airtight containers immediately after cooling
Many kitchen scales with high precision can help you monitor even the smallest weight changes as your herbs dry, ensuring you stop the process at the perfect moment for maximum flavor retention.
Your herbs’ll thank you. Keep it low and slow, and you’ll maintain those vibrant flavors and aromas that make homemade seasoning actually taste like something.
Meat Requires Maximum Temperature Control
Meat’s a whole different beast compared to those delicate herbs we just talked about. You’re dealing with food safety here, which means there’s basically no room for cutting corners. For jerky safety, you’ll want to crank that dehydrator up to around 160-170°F for the first few hours. This temperature kills off harmful bacteria that could make you sick.
Think of it like this: herbs just need gentle warmth, but meat demands maximum temperature control. You can’t get lazy with it. Some folks compare the process to sous vide cooking in reverse, where precise heat becomes your best friend. After you’ve hit that initial high temperature, you can drop it down a bit, but you’re still looking at 130-140°F minimum for the remainder of drying. Getting this right means delicious, safe jerky every single time.
The Hidden Food Safety Issues Nobody Warns You About
Most folks assume that if they’re dehydrating food at the right temperature, they’re automatically in the clear—but that’s where things get tricky. You’ve gotta understand that temperature alone won’t save you from all the nasty stuff lurking in your dehydrator.
Here’s what nobody really warns you about:
- Microbial hotspots can develop in areas where airflow’s uneven
- Cross contamination risks increase when you’re drying different foods simultaneously
- Moisture pockets hide inside thicker food pieces, creating bacteria breeding grounds
- Your dehydrator’s not getting cleaned thoroughly between batches
- Temperature inconsistencies occur near the edges or bottom racks
See, just because you’re hitting 160°F doesn’t mean every square inch of your jerky’s actually safe. You’re dealing with real food safety hazards that go way beyond what the manual mentions, so staying vigilant matters more than you’d think.
Why Slow Drying at Lower Temperatures Creates Better Flavor
When you’re drying food at lower temps, you’re basically giving those delicate enzymes a fighting chance to stick around longer, which means your jerky or fruit chips’ll taste way more vibrant and complex than the stuff you’d get from cranking the heat up to eleven. Your volatile compounds—the flavor superstars that make food taste like, well, food—they’re fragile little things, so slower drying means they’re not getting blasted away into thin air, and you’re actually keeping more of that good stuff locked in where it belongs. It’s kinda like the difference between a gentle simmer and a rolling boil; one gives you depth and nuance, the other just gives you… well, cooked.


Enzyme Preservation During Drying
Preserving those delicate flavor compounds that make food taste amazing requires understanding how heat affects enzymes, and here’s the thing: your dehydrator’s temperature setting makes all the difference.
When you keep temperatures lower, you’re basically giving enzymes a fighting chance. Enzyme kinetics work in your favor at gentler heat levels, allowing biochemical preservation to happen naturally. Your food retains more of those complex flavors that make you actually want to eat it.
Here’s what happens at lower temps:
- Enzymes stay active longer, breaking down starches into sugars naturally
- Heat-sensitive vitamins don’t get destroyed as quickly
- Volatile flavor compounds stick around instead of evaporating off
- Browning reactions develop slowly for deeper taste
- Nutritional value stays intact throughout the process
You’re basically letting science do the heavy lifting while you just wait around.
Volatile Compound Retention Methods
they’re basically the flavor rockstars of your food, and they’ll bail the moment temperature climbs too high. These aromatic compounds are what make your dehydrated apples smell amazing or your herbs taste vibrant. When you crank up the heat, you’re basically evicting all those good flavors before they can stick around.
Slow drying at lower temperatures is your secret weapon for aroma retention. You’re giving those volatile compounds time to stay put instead of floating away into thin air. Think of it like this: high heat equals rapid volatile loss, while patience equals flavor payoff. Most people don’t realize that dropping your dehydrator to 105 to 115 degrees can make a genuine difference in how delicious your finished product actually tastes.
Understanding the Sweet Spot Between Speed and Quality
As any dehydrator enthusiast will tell you, finding that perfect temperature sweet spot is where the magic happens—it’s basically the difference between ending up with leather-like jerky and accidentally making food dust.
You’re really balancing two competing forces here. Lower temps preserve nutrients but take forever. Higher temps move things along but risk cooking your stuff into oblivion. That’s where ideal timing and energy balancing come in.
Here’s what you’re juggling:
- Moisture removal speed versus nutrient preservation
- Energy consumption versus final product quality
- Texture outcomes from crispy to chewy
- Food type specific requirements and thickness
- Time investment versus your actual patience level
The sweet spot? Usually between 125°F and 145°F for most foods. You’ll find your rhythm pretty quick, honestly.
How Temperature Affects Texture: From Brittle to Leathery
Once you’ve locked in that sweet temperature range, you’ll quickly notice something pretty fascinating: the same food dried at different heats comes out looking and feeling totally different. Crank up your dehydrator to 160°F, and you’re gonna get that crispy finish on apples or banana chips that snaps between your teeth. Drop it down to 125°F though, and suddenly you’re looking at a supple chew that’s almost chewy-meets-dry. The thing is, higher temps speed things up but can make stuff brittle and kinda fragile. Lower temperatures take forever but give you that leathery texture that actually holds together. It’s like the difference between potato chip thin versus jerky thick. You gotta experiment with what texture you actually want before committing to a setting.
The Moisture Migration Effect at Various Temperature Ranges
Here’s the thing nobody tells you about dehydrator temps—they don’t just cook your food, they actually move moisture around in weird ways you’d never expect. When you’re running low heat, you’re basically asking the water inside your fruits and veggies to take a slow, leisurely stroll toward the surface, which sounds nice in theory but can lead to some uneven drying that’ll frustrate you later. The moisture migration effect means that different temperature ranges’ll pull moisture out at totally different speeds and patterns, affecting not just how fast your food dries but also how it’ll taste and feel when you’re done.
What Nobody Tells You About Food Dehydrator Temperature Settings
Most folks don’t realize that temperature doesn’t just dry your food, it actually moves moisture around inside it in ways that can totally mess up your results. You’re not just removing water, you’re basically shuffling it around, which creates some sneaky problems that nobody warns you about.
Here’s what’s really happening:
- Lower temps move moisture slowly, increasing microbial risks and spoilage chances
- Higher temps create moisture barriers on the outside, trapping water inside
- Uneven heating causes moisture to migrate toward cooler zones
- Rapid dehydration can lock in bacteria before they’re eliminated
- Energy efficiency suffers when you chase the perfect moisture balance
The trick? You’ve gotta understand that temperature controls both speed and safety, not just drying power.
The Moisture Migration Effect at Various Temperature Ranges
When you’re dehydrating food at different temperature ranges, you’re basically watching a moisture dance that’d make a choreographer jealous, except it’s way less organized and way more problematic. Here’s the thing: moisture doesn’t just politely exit your food in a straight line. Instead, it migrates internally through cellular osmotic processes, moving from wetter interior areas toward the drier surface. At lower temps, this happens slowly and unevenly. Crank up the heat though, and vapor pressure increases dramatically, forcing moisture outward faster than your food’s exterior can handle. This creates case hardening, where the outside seals up while the inside stays damp. You’re basically trapping moisture prisoners inside. Finding that sweet spot between temperature ranges prevents this frustrating outcome and keeps your dehydration process running smooth.
Low Heat: Slow Moisture Exodus
Low temperatures are basically the tortoise approach to dehydration, and honestly, sometimes slow and steady really does win the race. You’re working with slow diffusion here, where moisture gradually migrates from inside your food to the surface. It takes patience, but there’s real benefit to this method.
Here’s what happens when you keep things low and slow:
- Nutrients stay put instead of getting cooked away
- Enzymes remain partially active for longer periods
- Cellular contraction happens gently without shock
- Colors and flavors preserve better overall
- You’ll get chewier textures that some folks prefer
The downside? You’re looking at 12 to 24 hours of dehydration time. But if you’re after quality over speed, low heat’s your friend. Your food’ll thank you for the gentle treatment.
Common Temperature Mistakes That Waste Your Food and Money
Temperature mistakes in food dehydration can turn your perfectly good produce into an expensive, ruined mess faster than you’d think. One of the biggest culprits? Thermostat inaccuracies. Your dehydrator’s display might say 135°F, but it’s actually running at 150°F. That’s a recipe for case hardening, where the outside dries while moisture stays trapped inside.
You’re also probably setting temperatures way too high right off the bat. Sure, cranking it up seems efficient, but you’ll end up with tough, shriveled results instead of perfectly preserved food. Common mistakes include ignoring manufacturer guidelines and not accounting for humidity in your kitchen.
Here’s the thing: checking your dehydrator’s actual temperature with a reliable thermometer saves you tons of wasted produce and frustration down the road.
Frequently Asked Questions
Can I Use Different Temperature Settings Simultaneously for Multiple Food Types?
You can’t run different temperatures simultaneously on most dehydrators, but you’ll find workarounds using layered racks and staggered cycles. You’d need to rotate foods between cycles or invest in multi-zone dehydrators for true simultaneous temperature control.
How Do I Know When My Dehydrator’s Temperature Dial Is Actually Accurate?
You’ll want to perform a calibration check using an oven thermometer inside your dehydrator. Place it at the thermometer placement location where you’re drying food, then compare the reading to your dial’s setting for accuracy verification.
Will Preheating My Dehydrator to the Target Temperature Improve Overall Drying Results?
Yes, preheating benefits your results by establishing consistent heat distribution. You’ll avoid thermal cycling—those temperature fluctuations that can trap moisture and create uneven drying. Your food dehydrates more uniformly when you’ve reached your target temperature first.
What’s the Ideal Temperature for Dehydrating Herbs Versus Fruits Versus Vegetables?
You’ll want to dehydrate herbs at 95-115°F to preserve herb potency, fruits at 135-160°F for ideal fruit texture, and vegetables at 125-135°F. These temperatures guarantee you’re maximizing flavor and consistency across categories.
Does Ambient Humidity in My Kitchen Affect the Recommended Dehydrator Temperature Settings?
Yes, your kitchen’s ambient moisture affects your dehydrator settings. You’ll need higher temperatures when humidity’s elevated since it’ll slow moisture removal. Secure proper kitchen ventilation to optimize drying efficiency and prevent temperature adjustments.
Conclusion
Here’s the thing—you’ve gotta stop guessing with your dehydrator. Your thermometer’s lying to you, uneven heating’s creating bacterial party zones, and that brittle-turned-rubbery mess? Yeah, that’s case hardening talking. Match temps to your food, check actual internal temps, and embrace patience over speed. It’s annoying, sure, but you’ll actually get results worth eating instead of expensive mistakes.


