You’ve probably stared at a cutting board wondering why prep work takes longer than actually cooking. That’s where your food processor becomes your secret weapon. Whether you’re making pesto that tastes restaurant-quality or shredding enough veggies for the whole week, this one appliance cuts your prep time in half. But here’s the thing—most people aren’t using it to its full potential, and we’re about to change that.
Key Takeaways
- Food processors shred vegetables uniformly in minutes, eliminating manual grating for fritters, slaws, and veggie-based dishes.
- Homemade nut butters blend in 8–10 minutes, yielding fresher, creamier results than store-bought alternatives without additives.
- Pesto, hummus, and salsa process to restaurant-quality texture in 5 minutes using pulse technique to prevent over-blending.
- Cauliflower rice and vegetable medleys prepare instantly for grain-free meals, soups, and quick weeknight dinner bases.
- No-bake energy balls combine oats, nut butter, and dates in minutes, then refrigerate for weeks of grab-and-go snacks.


Homemade Pesto in Minutes
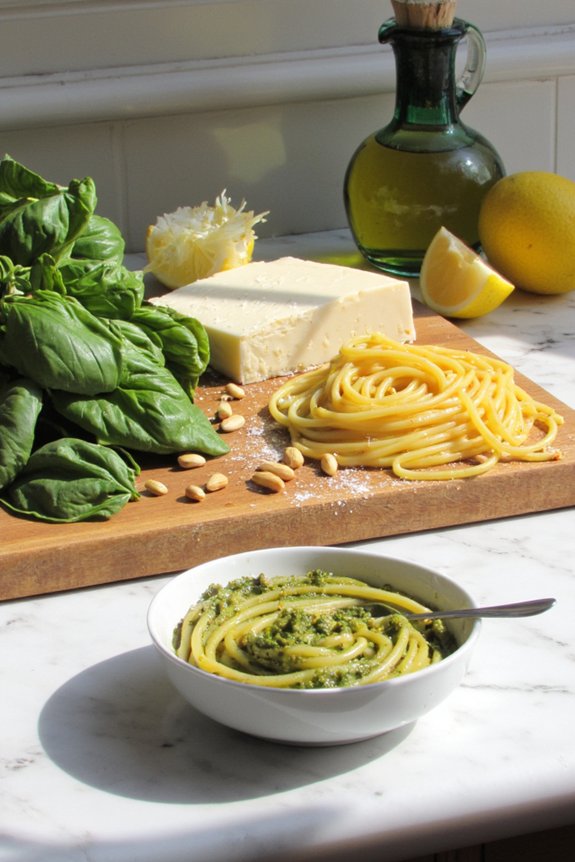
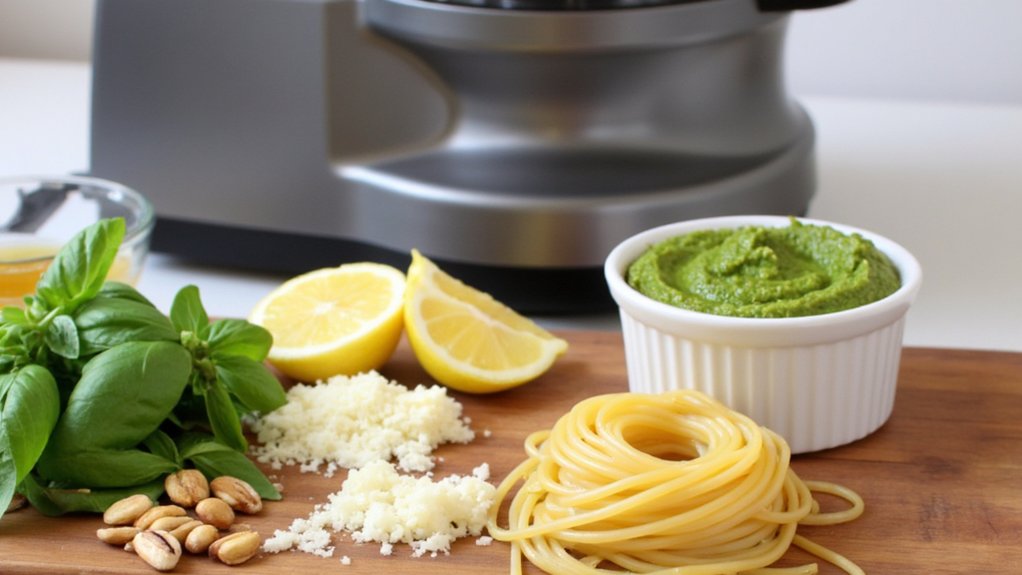
With a food processor, you’re literally minutes away from restaurant-quality pesto that’ll make you wonder why you ever bought the jarred stuff. Toss in fresh basil leaves, garlic, pine nuts, and parmesan cheese. Pulse everything together until you’ve got a quick chiffonade texture that’s chunky enough to have character but smooth enough to coat your pasta beautifully. Don’t forget the lemon zesting step—just a tablespoon of zest brightens everything up and gives it that zing jarred versions can’t match. Add your olive oil slowly while pulsing, and boom, you’re done. This whole process takes maybe five minutes, and honestly, homemade pesto tastes so much fresher than anything sitting on a shelf for months. For best results, use a food processor with stainless steel blades to ensure your pesto has the perfect texture and consistent chop every time.
Creamy Nut Butters Without the Store Price
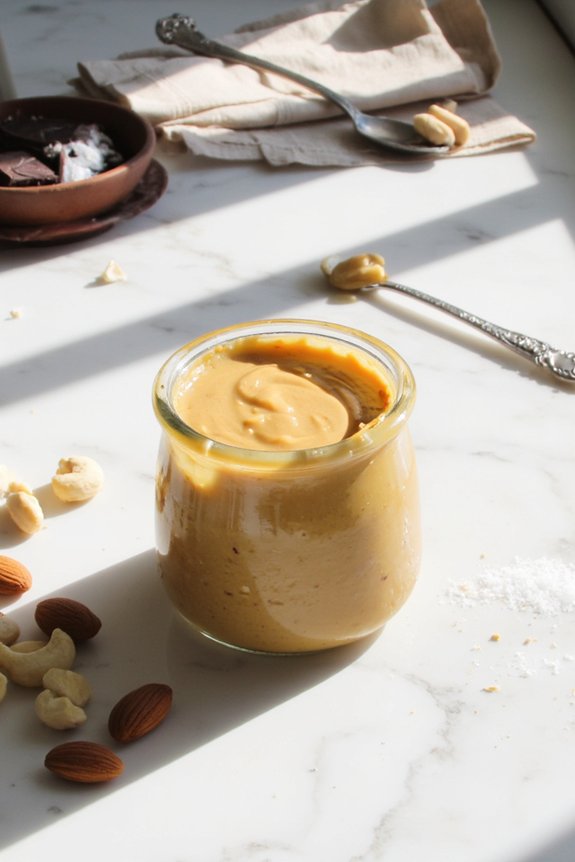
Making your own nut butters is honestly one of those kitchen hacks that’ll change your life—and your wallet. You’ll need just one ingredient: nuts. Here’s what you’re working with:
- Raw tahini as your base, or go with almonds, cashews, or peanuts
- A food processor that won’t quit on you
- About 8-10 minutes of blending time, maybe a bit more
- Optional add-ins like honey, cinnamon, or sea salt for flavored spreads
The magic happens when those oils release and everything turns silky smooth. It’s seriously cheaper than store-bought versions, and you’re controlling what goes inside. No weird additives or preservatives sneaking in. Your homemade butter’ll taste fresher, richer, and way more satisfying spread on toast or stirred into oatmeal. For the best results and to make sure your processor can handle nuts, make sure you’re using a model with at least motor power recommendation for these heavy-duty blending tasks.
No-Bake Energy Balls for Quick Snacks

Energy balls are basically the snack gods’ gift to anyone who’s ever needed something quick, satisfying, and not terrible for you. You’ll love how your food processor handles the heavy lifting here. Just toss in your base ingredients—oats, nut butter, dates—and let it do the work. The magic happens when you experiment with flavor pairings like chocolate and coconut or peanut butter and banana. These little powerhouses deliver serious protein boosts without requiring an oven or your sanity. Roll them into bite-sized spheres, refrigerate for an hour, and you’re golden. They’ll keep for weeks in your fridge, making them perfect for grabbing when hunger strikes. No baking. No fuss. Just pure snacking satisfaction. If you’re looking to save even more time on prep and storage, consider using reusable, food-grade bags to quickly portion and keep your energy balls fresh for longer.


Vegetable Fritters That Crisp Up Perfectly
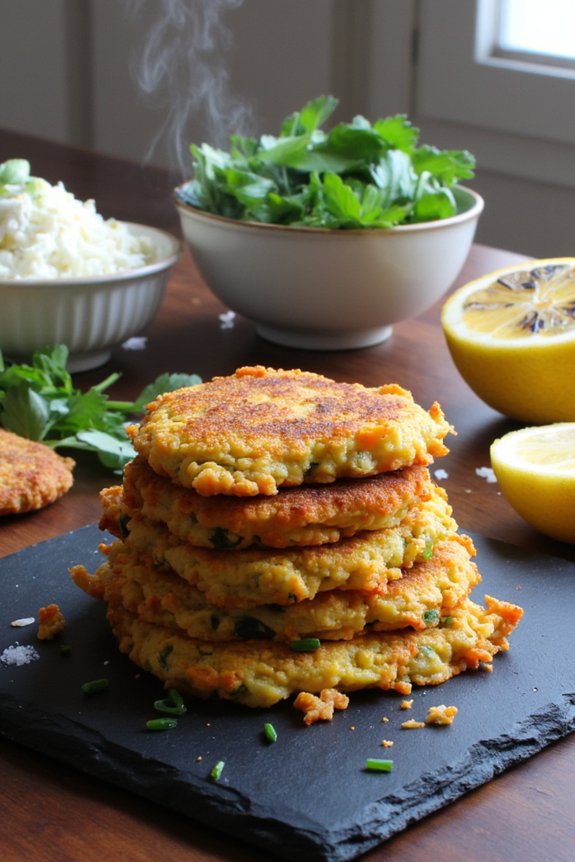
Your food processor becomes a vegetable-shredding machine when you’re ready to make fritters that actually crisp up instead of turning into soggy disappointments. Here’s what you need to nail this:
- Shred zucchini, carrots, and potatoes in seconds
- Salt your veggies and let them sit for moisture release
- Squeeze out excess liquid using paper towels
- Mix with flour, eggs, and seasonings for binding
The secret? Air drying batter before cooking. Let your mixture rest for a few minutes, which helps everything hold together better. Then use a proper pan frying technique with hot oil to get that golden, crispy exterior you’re craving. Your fritters’ll be perfectly textured, not mushy, and honestly, way better than store-bought versions.
Fresh Salsa and Guacamole From Scratch

Your food processor is about to become your salsa and guac best friend, and here’s the thing—it’s all about that pulse technique to get the texture just right without turning everything into baby food. You’ll want to prep your ingredients first, cutting them into chunks so they process evenly, and then pulse in short bursts until you’ve got that perfect chunky-but-combined consistency that actually tastes homemade instead of store-bought. Once you’ve nailed your masterpiece, store it smart in airtight containers, keep it cold, and remember that fresh is best, so try to serve it within a day or two before the avocado decides to get all brown and sad on you. If you’re looking to save even more time in the kitchen, consider using a multi-functional electric pressure cooker for batch meal prepping alongside your fresh dips.
Pulse Technique for Texture
Mastering the pulse technique transforms your food processor from a blender-wannabe into a texture-control wizard, and honestly, it’s the secret weapon behind restaurant-quality salsa and guacamole. This knife simulation method beats continuous blending every single time.
Here’s how to nail the intermittent chopping approach:
- Hold down the pulse button for one-second bursts, releasing completely between each pulse
- Watch your ingredients transform gradually rather than turning into mush instantly
- Stop when you’ve got visible chunks still hanging around in there
- Rest your finger between pulses so you’re actually controlling the action
You’ll notice the difference immediately. Your salsa keeps that fresh, chunky personality, and your guac stays luxuriously textured instead of becoming baby food. That’s the magic right there. If you want even more control over texture outcomes, some food processors and immersion blenders offer variable speed and turbo functions to fine-tune your results.
Ingredient Prep and Processing
Before you even think about hitting that pulse button, getting your ingredients prepped right is what separates mediocre salsa from the kind that makes people ask for your recipe. You’ll want to chop your tomatoes into rough chunks first, then tackle those onions and cilantro. For a speedy chiffonade of fresh basil or mint, stack your leaves, roll ’em tight, then slice thin strips. The food processor handles uniform dicing beautifully when you feed ingredients through the feed tube steadily. Don’t overload the bowl or you’ll end up with mush instead of texture. Prep your jalapeños by removing seeds if you’re heat-sensitive, keep avocados whole until the last minute, and have your lime juice ready. Good prep means better results, faster processing, and honestly, less cleanup afterward.
Storage and Serving Tips
Once you’ve whirled up that perfect batch of salsa or guac, the real challenge isn’t the processing—it’s keeping it fresh and getting it to the table at just the right moment. Here’s how to nail the storage and serving game:
- Transfer immediately into airtight containers to lock in that vibrant color and flavor
- Press plastic wrap directly onto the surface of guacamole to prevent browning
- Refrigerate for up to three days, though honestly, it rarely lasts that long
- Grab your favorite serving garnishes like cilantro, lime wedges, and crispy tortilla chips
The key’s timing everything so your salsa and guac are chilled but not ice-cold when guests arrive. You’re creating an experience, not just serving food. That matters.


Smooth and Silky Hummus Variations
Your food processor is basically a hummus-making superhero, and you’re about to discover just how easy it is to whip up restaurant-quality dips right in your own kitchen. The secret? Roasted garlic. This ingredient transforms basic hummus into something seriously incredible that’ll have everyone asking for your recipe.
Start with canned chickpeas, tahini, lemon juice, and water. But here’s where it gets fun—try a tahini swap. Use half tahini and half almond butter for a richer, slightly different flavor profile that’s absolutely delicious. Pulse everything together until it’s perfectly smooth and creamy.
Want more variations? Roasted red peppers add sweetness. Fresh herbs like cilantro or parsley bring brightness. Even a pinch of cumin works wonders. Your food processor handles all the heavy lifting, transforming simple ingredients into dips that taste like you spent hours preparing them.
Breadcrumbs and Panko in Seconds
Making breadcrumbs and panko from scratch sounds like it’d be a whole thing, but it’s honestly one of the easiest tricks your food processor can pull off. You’ll have homemade breadcrumbs in literally minutes, and here’s what makes it so simple:
- Grab stale bread, bagels, or crackers you’ve got hanging around
- Tear everything into chunks and toss into your processor
- Pulse until you’ve got the texture you’re after, whether fine or chunky
- Store in an airtight container for weeks
Skip those pricey store-bought versions. Your homemade breadcrumbs work as killer coating alternatives for chicken, fish, or veggies, and they’re way fresher tasting. Plus, you can customize them with flavor enhancers like garlic powder, herbs, or parmesan. Total game changer for your kitchen.
Overnight Oats and Smoothie Bowls
Your food processor becomes your best friend when you’re prepping overnight oats and smoothie bowls, since it’ll blend those base ingredients—oats, yogurt, milk, and frozen fruit—into a creamy foundation in about thirty seconds flat. You’ve got tons of options for mix-ins and texture, whether you want it smooth as silk, chunky with granola and nuts, or somewhere in between, and the processor handles all of it without breaking a sweat. Once you’ve got your batches mixed up, just portion ’em into mason jars or containers, stick ’em in the fridge, and you’re looking at grab-and-go breakfasts for the whole week.
Blending Base Ingredients Quickly
Overnight oats and smoothie bowls are basically the lazy person’s shortcut to breakfast—except they’re actually healthy, so you won’t feel guilty about sleeping in. Your food processor transforms prep time from annoying to actually manageable. Here’s what you’re working with:
- Oats, milk, and yogurt blend into creamy speedy emulsions in seconds
- Frozen fruit becomes silky protein purées when you pulse it down
- Nuts and seeds get chopped fine without that manual labor nightmare
- Toppings like granola and coconut flakes get prepped while your base sits
Dump everything in, hit blend, and you’re basically done. No hand-mixing, no waiting around. The processor does the heavy lifting so you can actually enjoy your morning instead of standing there like you’re making cement. Your future self will thank you for this move.
Mix-Ins and Texture Options
The beauty of mix-ins is that they’re totally customizable based on what you’ve got hanging around your kitchen. You can throw in nuts, seeds, fresh berries, or chocolate chips without any fuss. The key to nailing texture contrasts is timing your additions right. Add crunchy stuff like granola at the very end so it doesn’t get soggy. If you’re blending a smoothie bowl, toss in softer ingredients first, then layer those crispy elements on top. Think about what textures you actually want when you’re eating it. Chewy coconut flakes pair beautifully with crispy almonds and soft banana slices. Don’t overthink mix-in timing either. Just experiment and see what works for your taste buds and your morning vibe.
Meal Prep Storage Tips
Since you’ve got all those gorgeous mix-ins prepped and ready, you’ll want to know how to keep your creations fresh and delicious throughout the week. Here’s the real deal on storage that actually works:
- Use airtight glass containers to prevent your oats from getting soggy or your bowls from absorbing fridge odors
- Try vacuum sealing individual portions for smoothie bowls, which keeps everything fresher longer and saves major space
- Implement a label system with dates so you’re not playing guessing games about what’s three weeks old
- Store wet and dry ingredients separately when possible, combining them only when you’re ready to eat
This approach keeps everything tasting amazing and prevents that sad, mushy situation nobody wants.
Homemade Nut Flours for Baking
Making your own nut flours at home is honestly one of those kitchen moves that feels fancy but takes like five minutes, and once you start doing it, you’ll wonder why you ever bought the pre-packaged stuff. You’ll save money and have way fresher ingredients for your baking projects.
Your food processor does all the heavy lifting here. Just pulse raw nuts until they’re finely ground, and boom, you’re done. Want almond substitutions? Try pecans or walnuts. Prefer seed blends? Mix sunflower with pumpkin seeds for something totally different.
| Nut | Grind Time | Best For |
|---|---|---|
| Almonds | 3-4 min | Cookies, cakes |
| Pecans | 4-5 min | Brownies, pie crusts |
| Hazelnuts | 3-4 min | Pastries, tortes |
Store your homemade flour in airtight containers in the fridge to keep it fresh longer.
Vegetable Rice and Cauliflower Rice Bases
Your food processor is about to become your secret weapon for creating rice bases that’ll make weeknight dinners way easier. Whether you’re ricing cauliflower for a low-carb swap or shredding fresh vegetables in seconds, this kitchen tool does the heavy lifting so you don’t have to stand there with a box grater like it’s 1995. Once you get the hang of it, you’ll be tossing together veggie-packed bases for grain bowls, stir-fries, and more faster than you can say “what’s for dinner.”
Vegetable Rice and Cauliflower Rice Bases
Grain-free cooking gets a whole lot easier when you’ve got a food processor doing the heavy lifting. You’ll wonder how you ever survived without one.
Your food processor transforms prep work into something actually manageable. Here’s what you can whip up:
- Cauliflower rice for grain-free bases that work in any dish
- Riced soups that come together faster than traditional versions
- Vegetable medleys for stovetop risotto without the constant stirring
- Mixed veggie blends ready to toss into anything
The machine pulses raw veggies into perfect rice-sized pieces in seconds. No more hand-chopping until your fingers cramp. You’ll prep enough base ingredients for multiple meals without breaking a sweat. It’s genuinely game-changing for weeknight dinners when you’re already stretched thin.
Shredding Fresh Vegetables Quickly
Once you’ve got your veggie rice bases down, the real magic happens when you start shredding fresh vegetables with that same food processor. Your zucchini, carrots, and beets transform into perfect strands in seconds. The shredding disk does heavy lifting that’d take forever by hand, honestly. You can achieve a quick julienne effect with the right blade attachment, giving you restaurant-quality cuts without breaking a sweat. Just feed your veggies through the chute and watch ’em go. Don’t forget about blade maintenance though—rinse those disks immediately after use so residue doesn’t dry on. Sharp, clean blades mean faster, safer shredding every single time.
Frequently Asked Questions
What’s the Best Way to Clean a Food Processor After Making Sticky Nut Butters?
You’ll want to disassemble the bowl and blade immediately. Use a silicone spatula to scrape residue, then soak in hot water with plastic safe detergent. Finally, give everything a warm rinse and air dry completely.
Can I Use a Food Processor to Knead Dough for Bread Making?
Yes, you can use your food processor for machine kneading, though it won’t develop gluten as effectively as hand kneading or a stand mixer. You’ll need to process in short pulses and monitor the dough’s consistency carefully.
How Do I Prevent Over-Processing Ingredients Into a Paste or Powder?
You’ll prevent over-processing by using your food processor’s pulse setting instead of continuous processing. This gives you better chunk control, letting you stop immediately when ingredients reach your desired texture rather than becoming paste or powder.
What Size Food Processor Is Best for a Small Household?
You’ll want a compact 3.5-quart food processor for most small household tasks. However, if you’re just prepping for one or two people, a single-serve mini processor handles smaller batches efficiently without wasting counter space.
Are Food Processors Better Than Blenders for Certain Recipes?
Yes, food processors outperform blenders for certain recipes. You’ll get better texture control with various blade types, superior motor power for tough ingredients, and recipe matching capabilities. They’re ideal for chopping, slicing, and kneading tasks blenders can’t handle effectively.
Conclusion
You’ve got this. A food processor isn’t just another kitchen gadget gathering dust—it’s your secret weapon for getting dinner on the table without losing your mind. Whether you’re whipping up pesto, grinding nut butters, or ricing cauliflower, you’re basically giving yourself hours back every week. Less chopping, more eating. Your future self will thank you.


