So you’ve just fried a turkey and now you’re staring at a pot of hot oil and a greasy fryer, wondering what on earth to do next so your kitchen doesn’t smell like a fast-food joint for a week. You can’t just dump the oil in the sink, and you don’t want to wreck your fryer either, so let’s walk through how to cool, clean, store, and toss everything the right way, without turning it into a big messy project.
Key Takeaways
- Let the fryer and oil cool completely (at least 2 hours); confirm with a thermometer before handling to prevent burns or thermal shock.
- Carefully strain cooled oil through a fine mesh or filter, store reusable oil in a labeled, airtight container in a cool, dark place.
- When oil is no longer usable, pour it into a sturdy, sealable container and take it to a community cooking-oil recycling or collection site.
- If no recycling is available, seal cooled oil in a leakproof container and place it in the trash—never pour oil down sinks or drains.
- After removing oil, wash the fryer pot and parts in hot soapy water, gently scrub with non-scratch tools, rinse well, dry, and inspect components.


Understanding Your Turkey Fryer and Cooking Oil

Before you plunge into cleaning, it really helps to understand what’s going on inside that turkey fryer and in the oil you’re using. Your fryer materials matter a lot, since aluminum, stainless steel, and coated pots can react differently to heat, scrubbing, and cleaners. If you know what it’s made of, you won’t scratch it up or wear it out early.
Then there’s the oil composition. Different oils handle heat in different ways, some stay stable and others break down faster, turning dark and sticky. Old oil leaves more gunk, clings to the sides, and can make cleaning feel like a small punishment. When you notice thick buildup and weird smells, that’s your cue the oil’s chemistry is basically quitting.
It’s also important to remember that aluminum and stainless steel fryers each have different care requirements, which affects both cleaning techniques and how well your fryer holds up over time.
Safety Precautions Before You Start Cleaning

Before you grab a sponge and roll up your sleeves, you’ve gotta make sure that fryer is completely cool, or you’re just asking for a nasty burn. You’ll also want to protect yourself with things like heat-resistant gloves, closed-toe shoes, and clothes you don’t mind getting a little greasy. Finally, set up a safe work area with good lighting, plenty of space, and no kids or pets zooming around like it’s a racetrack. It’s also a good idea to check that your fryer has cool-touch handles or sides to help prevent accidental burns while you’re moving or cleaning it.
Cool Down Fryer Completely
Even though you’re probably keen to start scrubbing and put everything away, you’ve got to let that turkey fryer cool down completely first. Hot oil holds heat for a long time, so don’t trust it just because it “looks” calm. Go by temperature indicators if your fryer has them, or use a thermometer and wait until the oil is close to room temp.
If your fryer’s outside, give it plenty of time in a safe spot where no one will bump it. Rushing this step can cause thermal shock if you add water or cleaner too soon, and that can crack metal or coating, or make the oil spit and pop like it’s angry at you personally. Taking your time here also helps protect the integrity of your equipment, much like how high-quality countertop appliances require proper cooling and cleaning to maintain performance.

Protect Yourself From Burns
Here’s a quick cheat sheet:
| Body part | What to protect it with |
|---|---|
| Hands | Heat resistant gloves |
| Arms | Long sleeves |
| Chest | Splash shield apron |
| Eyes | Safety glasses |
| Feet | Closed-toe shoes |
When cleaning a turkey fryer, always be mindful of steam release safety to avoid accidental burns from hot vapor or splattering oil.
Prepare Safe Work Area
You’ve got your safety gear on, so now it’s time to make sure the space around your fryer isn’t working against you. First, pick a flat, stable surface away from kids, pets, and anything that could catch fire. Clear clutter so you’re not tripping over random stuff while holding a greasy pot.
Good workspace ventilation is key, since you don’t want to stand in a cloud of oil fumes. Open windows, crack a door, or work in the garage with the door up. If you’re outside, stay out of the wind so splashes don’t blow back at you.
Lay down non slip matting or old towels under the fryer, so if oil spills, you’re not ice-skating in it.
If you’re using an induction cooktop as your heat source, make sure it’s set up on a dry, level surface and plugged safely into a standard outlet to avoid electrical hazards.
How to Cool and Filter Used Turkey Frying Oil

Once the turkey’s carved and everyone’s in a food coma, it’s time to deal with that big pot of hot oil without burning yourself or turning the backyard into a crime scene. Turn off the burner, leave the pot uncovered, and let the oil cool for at least 2 hours. You want it warm, not blazing.
For oil clarifying and flavor preservation, grab a large container, a funnel, and some paper or mesh filters. Strain slowly so crumbs don’t sneak through, and stop pouring before you hit the sludge on the bottom.
| Step | What you do |
|---|---|
| 1 | Let oil cool safely |
| 2 | Set up funnel and filter |
| 3 | Pour slowly, avoid spills |
| 4 | Toss used filters |
| 5 | Seal and label filtered oil |
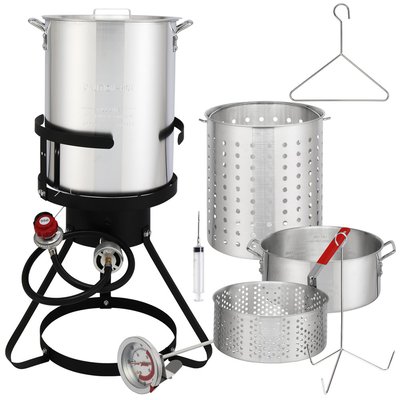
Step-by-Step Guide to Cleaning the Fryer Pot and Components

Once your oil’s cooled and stored away, it’s time to roll up your sleeves and actually clean the fryer pot and all the greasy bits that go with it. You’ll start by getting the last of the oil out, then wash the pot, basket, and other parts so they’re not slick and sticky anymore. After that, you’ll dry everything really well and put it all back together so your fryer’s ready for the next turkey showdown.
Cooling and Oil Removal
Cooling hot fryer oil isn’t something to rush, so first let that pot sit undisturbed until the oil comes all the way down to a safe, room‑temp kind of warm. You’re not making soup here, you’re avoiding burns, so give it at least a couple hours.
As it cools, you might notice oil crystallization or a hazy look, especially with reused oil. That’s normal. Thermal stratification can happen too, where the top feels cooler than the bottom, so don’t trust a quick finger test. Once it’s cool, set a clean container nearby, then slowly pour the oil through a fine mesh strainer or cheesecloth to catch crumbs. Leave the sludge in the bottom of the pot. That stuff’s done working for you.

Washing Pot and Parts
You’ve got the oil out of the way, so now it’s time to deal with the not‑so-glamorous part: scrubbing that fryer pot and all the bits that went in with it. Fill the pot with hot water and a good squirt of dish soap, letting it soak to loosen crusty bits and seasonal stains.
Use a non‑scratch sponge or soft brush, working from the rim down, and pay extra attention to the oil line. For stubborn spots, sprinkle baking soda and gently scrub. Clean the basket, lid, thermometer, and any removable parts in the same soapy water so you’re not spreading chemical residues around next time.
Rinse everything really well until the water runs clear and no soap film remains.
Drying and Reassembly Steps
When all the suds are rinsed away and everything looks clean, it’s time to get that fryer bone‑dry so you don’t end up with rust, sticky spots, or weird flavors next time. Shake off extra water, then towel‑dry the pot, lid, basket, and burner frame. Let everything air dry on a clean rack or towel, giving it time so hidden moisture can escape.
Check the burner and hoses for any damp spots and wipe them carefully. If your fryer has rubber seals, do a quick gasket lubrication with a tiny bit of cooking oil so they don’t dry out or crack. When everything’s dry, reassemble the pot, stand, and burner slowly, making sure every nut, bolt, and connection feels snug and solid.
Storing and Reusing Turkey Frying Oil Safely

Honestly, good turkey frying oil is kind of like liquid gold, so it makes sense to store and reuse it instead of pouring it out after one bird. Once the oil’s cooled, strain it through a fine mesh strainer lined with a coffee filter or paper towel to catch crumbs and bits of batter. That helps prevent burnt flavors and flavor transfer next time you fry.
Pour the clean oil into a food safe, airtight container, label it with the date, and stash it in a cool, dark spot. Think pantry, not next to the stove. Shelf life depends on how hot you got it and how clean it stays, but usually you’ll get about three to five uses before it starts smelling off.
Proper Disposal Methods for Used Cooking Oil
At some point though, even the best “liquid gold” oil reaches the end of the road, and that’s where getting rid of it the right way really matters. You don’t want it clogging pipes or wrecking your yard, and you definitely don’t want the environmental impact on soil and waterways.
Let the used oil cool, then pour it into a sturdy, sealable container. From there, you’ve got options. Check if your town has a community collection site or recycling center that takes used cooking oil, since a lot of it gets turned into biodiesel. No drop-off nearby? Seal the container tight and toss it in the trash, never the sink. Even a “little bit” down the drain adds up, kind of like dishes after Thanksgiving.
Maintenance Tips to Keep Your Turkey Fryer in Top Shape
Even though turkey fryers seem pretty tough, they’re a lot like your car or grill: if you don’t give them a little love now and then, they’ll return the favor with problems right when you’re hungry. So treat yours to simple Seasonal maintenance. Before and after the holidays, wipe everything down, tighten loose knobs, and check for any soot buildup.
Do a quick component inspection every time you use it. Look at the burner holes for clogs, make sure the stand isn’t wobbly, and inspect hoses or cords for cracks. If it’s gas, brush off spider webs, they love those burners. Store your fryer dry, covered, and out of the weather, so it doesn’t rust or turn into a weird yard sculpture.
Frequently Asked Questions
Can I Use Turkey Fryer Oil for Other Foods Like Fish or Donuts?
You can, but you shouldn’t. Turkey fryer oil causes strong flavor transfer, so fish or donuts’ll taste like turkey. Reheated oil’s lower smoke point also means more burning, off-flavors, and potential safety issues; use fresh oil instead.
How Do I Remove Burnt Turkey Smell From My Fryer and Kitchen?
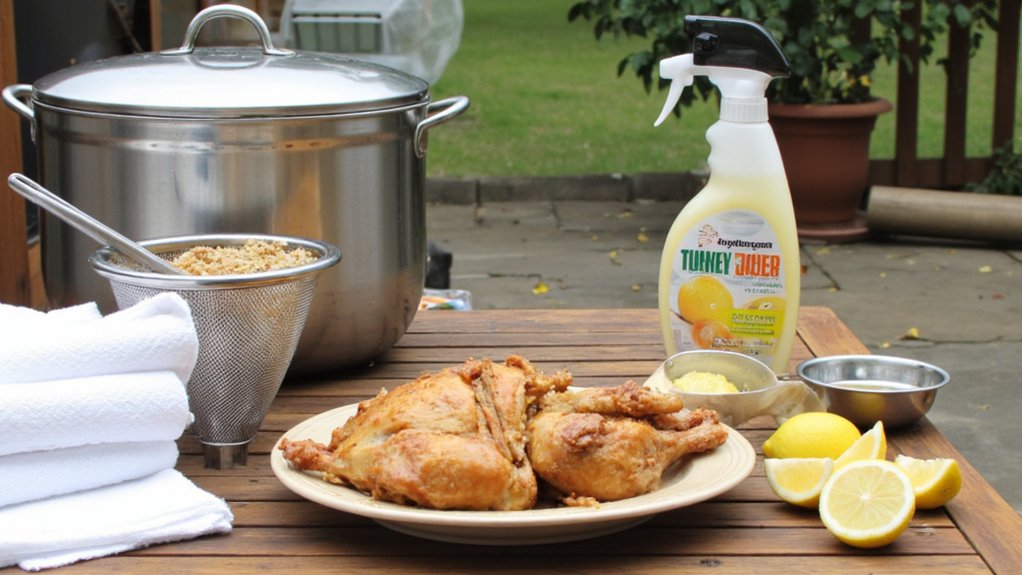
You’ll clear burnt turkey smells by simmering water with lemon or orange slices (citrus steaming), scrubbing the fryer, then placing a charcoal deodorizer nearby; ventilate well and wipe surfaces with vinegar-water to finish.
What Type of Oil Is Best for Fewer Odors and Easier Cleanup?
You’ll get fewer odors and easier cleanup using high‑smoke‑point oils like refined peanut or neutral vegetable oil; they break down less, smell milder, filter easily, and you can often reuse them several times.
Can I Clean My Turkey Fryer Outdoors During Winter or Freezing Temperatures?
You can, but you’ve gotta watch freezing temps. Let the fryer cool, avoid water on ice, and use thaw precautions for any leftover oil. Dry everything thoroughly before winter storage to prevent rust and cracking.
How Often Should I Fully Replace Oil Versus Just Topping It Off?
You should fully replace oil every 3–4 uses, sooner if it smells off or darkens. Don’t just top it off if you notice oil degradation, excessive foaming, or flavor transfer between different foods.
Conclusion
So that’s it, you’ve basically mastered the post-turkey-fry clean‑up. Let the oil cool, strain it, reuse it if it’s still good, and recycle or toss it the right way when it’s done. Clean the pot, check your hoses and seals, and stash everything somewhere dry. Future you will be very happy. And your drains won’t hate you, which is always a win on a holiday weekend.


